1. 快速开始1. Quick Start
5 步接入万能API,从注册到第一次调用不超过 5 分钟。 Get up and running in under 5 minutes — from sign-up to your first API call.
-
注册账号Create an account
访问Visit 注册Register 填写邮箱即可开通 TRIAL 套餐,永久免费。and sign up with your email to start the free TRIAL plan.
-
创建 API KeyCreate an API Key
进入控制台 → API Key → 创建新 Key。请妥善保存明文,关闭页面后无法再次查看。Key 格式:
sk-+ 64 位 hex,共 67 字符。Go to Dashboard → API Keys → Create new. Save the plaintext immediately — you won't see it again. Key format:sk-+ 64 hex chars = 67 chars total. -
选一个客户端工具Pick a client tool
跳到 第 2 节「工具快速入口」挑一个 — Claude Code / Codex / OpenCode / Gemini CLI / OpenClaw / Dify / n8n / ComfyUI。每个工具都有"复制粘贴即用"的配置示例。Jump to section 2 Tools Index and pick one — Claude Code / Codex / OpenCode / Gemini CLI / OpenClaw / Dify / n8n / ComfyUI. Each tool ships a copy-paste-ready config.
-
第一次调用(cURL 测试)Your first call (cURL test)
把
base_url指向万能API,使用任意 OpenAI 兼容模型 ID:Pointbase_urlto Universal API and use any OpenAI-compatible model ID:curl https://api.wannapi.com/v1/chat/completions \ -H "Authorization: Bearer $YOUR_KEY" \ -H "Content-Type: application/json" \ -d '{ "model": "gpt-5.4", "messages": [{"role": "user", "content": "你好Hello"}] }' -
查看用量Check usage
控制台 → 用量 实时显示 Token 消耗、调用次数、剩余配额。Dashboard → Usage shows real-time token consumption, call counts, and remaining quota.
2. 工具快速入口2. Tools Index
万能API 兼容 OpenAI 协议,已对接以下 8 款主流工具。点击卡片跳到对应接入章节,每个工具都有完整的安装 / 配置 / 验证步骤。 Universal API is OpenAI-compatible and works out of the box with these 8 popular tools. Click a card to jump to the setup section — each one ships install / config / verify steps.







3. Claude Code 接入3. Claude CodeAnthropic 官方 CLI
Claude Code 是 Anthropic 官方的 AI 编码助手 CLI(anthropic.com/claude-code)。万能API 兼容 Anthropic 协议,Claude Code 1.x 起支持自定义 ANTHROPIC_BASE_URL,可作为 drop-in 替换使用。本节介绍终端 CLI 形态的完整接入流程;GUI 形态见 16.1 Claude Desktop 桌面端。
Claude Code is Anthropic's official AI coding assistant CLI (anthropic.com/claude-code). Universal API is Anthropic-protocol-compatible; Claude Code 1.x+ supports ANTHROPIC_BASE_URL for drop-in replacement. This section covers the terminal CLI variant; for the GUI variant see 16.1 Claude Desktop Desktop.
3.1 前置条件3.1 Prerequisites
- 已注册万能API 账号(注册入口)A registered Universal API account (sign up)
- 已安装 Node.js 18+(
node -v查看;不满足则去 nodejs.org 下载 LTS)Node.js 18+ installed (check withnode -v; otherwise download LTS from nodejs.org) - 当前网络可访问
https://api.wannapi.comNetwork reacheshttps://api.wannapi.com
3.2 安装 Claude Code CLI3.2 Install Claude Code CLI
- 在终端运行(macOS / Linux / WSL / Windows PowerShell / CMD 均适用):In a terminal (works on macOS / Linux / WSL / Windows PowerShell / CMD):
npm install -g @anthropic-ai/claude-code- 安装完成后
claude --version验证版本号Verify withclaude --version
3.3 在万能API 控制台创建 Claude 专用令牌3.3 Create a Claude-dedicated token in the Universal API console
- 登录 wannapi.com → 控制台 → 令牌管理 → 添加令牌Log in to wannapi.com → Console → Token Management → Add Token
- 名称:建议
Claude Code CLIName:Claude Code CLI(suggested) - 分组:选含
claude-fable-5/claude-opus-4-8/claude-sonnet-4-6的 Claude 全模型分组(详见 #models)Group: pick a Claude-all group containingclaude-fable-5/claude-opus-4-8/claude-sonnet-4-6(see #models) - 额度:默认(不限制)Quota: default (unlimited)
- 提交 → 复制密钥(
sk-开头共 67 字符)Submit → Copy Key (sk--prefixed, 67 chars total)
3.4 方式一:settings.json 配置(推荐)3.4 Method 1: settings.json (recommended)
编辑 ~/.claude/settings.json(用户级,对所有项目生效)或项目根目录的 .claude/settings.json(项目级,仅本仓库生效):Edit ~/.claude/settings.json (user-level, applies to all projects) or the project root's .claude/settings.json (project-level, applies to this repo only):
{
  "env": {
    "ANTHROPIC_AUTH_TOKEN": "sk-粘贴你的万能API-Keysk-paste your Universal API Key",
    "ANTHROPIC_BASE_URL": "https://api.wannapi.com",
    "ANTHROPIC_DEFAULT_HAIKU_MODEL": "claude-fable-5",
    "ANTHROPIC_DEFAULT_OPUS_MODEL": "claude-opus-4-8",
    "ANTHROPIC_DEFAULT_SONNET_MODEL": "claude-sonnet-4-6",
    "ANTHROPIC_MODEL": "claude-fable-5(须确保在万能API 控制台分组中存在模型)(must exist in your Universal API token group)",
    "ANTHROPIC_REASONING_MODEL": "claude-opus-4-8"
  },
  "includeCoAuthoredBy": false
}ANTHROPIC_BASE_URL: 万能API 入口,固定https://api.wannapi.com(不要带/v1,Claude Code 自动追加)Universal API endpoint, fixed ashttps://api.wannapi.com(don't append/v1; Claude Code adds it)ANTHROPIC_AUTH_TOKEN: 万能API 令牌,sk-开头共 67 字符(sk-+ 64 位 hex)Universal API token, starts withsk-, 67 chars total (sk-+ 64 hex)ANTHROPIC_DEFAULT_HAIKU_MODEL: 小任务/快速响应模型,建议claude-fable-5quick-task model;claude-fable-5recommendedANTHROPIC_DEFAULT_OPUS_MODEL: 深度推理任务模型,建议claude-opus-4-8deep-reasoning model;claude-opus-4-8recommendedANTHROPIC_DEFAULT_SONNET_MODEL: 平衡型日常任务模型,建议claude-sonnet-4-6balanced everyday-task model;claude-sonnet-4-6recommendedANTHROPIC_MODEL: 默认模型(不指定子任务类型时使用)default model when no sub-task type is specifiedANTHROPIC_REASONING_MODEL: 深度思考/extended thinking 专用模型dedicated model for extended thinkingincludeCoAuthoredBy: 设false关闭 git commit 自动追加Co-Authored-By: Claude尾签(默认true)setfalseto suppress theCo-Authored-By: Claudetrailer on git commits (defaulttrue)
3.5 方式二:环境变量配置(不用 settings.json 时)3.5 Method 2: environment variables (no settings.json)
macOS(zsh,默认 shell):macOS (zsh, default shell):
- 打开"终端"(Terminal)Open Terminal
- 编辑
~/.zshrc(如不存在会自动创建):Edit~/.zshrc(auto-created if missing):
nano ~/.zshrc- 在文件末尾追加这两行(替换
sk-...为你的实际 Key):Append these two lines at the end (replacesk-...with your actual Key):
export ANTHROPIC_AUTH_TOKEN="sk-粘贴你的万能API-Keysk-paste your Universal API Key"
export ANTHROPIC_BASE_URL="https://api.wannapi.com"- 保存并退出 nano:按
Ctrl + O→ 回车(写入文件) →Ctrl + X(退出)Save and quit nano:Ctrl + O→ Enter (write) →Ctrl + X(exit) - 立即加载配置:
source ~/.zshrcReload immediately:source ~/.zshrc - 验证:Verify:
echo $ANTHROPIC_AUTH_TOKEN
echo $ANTHROPIC_BASE_URL两条命令都打印出对应值即为成功。Both commands printing the expected values means success.
Linux / 旧 macOS(bash):把上面所有 ~/.zshrc 换成 ~/.bashrc(或 ~/.bash_profile,视系统而定),其他命令相同。Linux / older macOS (bash): replace every ~/.zshrc above with ~/.bashrc (or ~/.bash_profile, depending on your system); the rest is identical.
临时设置(仅当前终端会话有效,重启或新窗口失效):直接在命令行 export 即可,无需写文件:Temporary setting (current session only; gone after restart or new window): just export directly, no file edit needed:
export ANTHROPIC_AUTH_TOKEN="sk-粘贴你的万能API-Keysk-paste your Universal API Key"
export ANTHROPIC_BASE_URL="https://api.wannapi.com"
Windows(CMD / PowerShell):用 setx 永久写入注册表:Windows (CMD / PowerShell): use setx to persist to the registry:
setx ANTHROPIC_AUTH_TOKEN "sk-粘贴你的万能API-Keysk-paste your Universal API Key"
setx ANTHROPIC_BASE_URL "https://api.wannapi.com"重要:setx 只影响新打开的 CMD / PowerShell 窗口,不影响当前窗口——执行完关闭并重开新终端。Important: setx only affects new CMD / PowerShell windows; close and reopen your terminal after running it.
或用 GUI:Win+R → 输入 sysdm.cpl → 高级 → 环境变量 → 新建用户变量 ANTHROPIC_AUTH_TOKEN 和 ANTHROPIC_BASE_URL。Or use the GUI: Win+R → type sysdm.cpl → Advanced → Environment Variables → add user variables ANTHROPIC_AUTH_TOKEN and ANTHROPIC_BASE_URL.
3.6 验证3.6 Verify
cd your-project
claude "用中文写一个 hello worldwrite a hello world in Chinese"
看到中文回复 + 退出码 0 即为成功。模型 ID 用万能API 支持的 Claude 全家桶:claude-fable-5(默认)/ claude-opus-4-8(强推理)/ claude-sonnet-4-6(平衡)。A Chinese reply + exit code 0 means success. Use Universal API's Claude family: claude-fable-5 (default) / claude-opus-4-8 (deep reasoning) / claude-sonnet-4-6 (balanced).
3.7 常见问题3.7 FAQ
Q: 401 Unauthorized?Q: 401 Unauthorized?
检查 Key 格式(必须 sk- + 64 位 hex,共 67 字符);确认 ANTHROPIC_AUTH_TOKEN 已设置在 settings.json 的 env 字段下,或环境变量已被新终端加载。Check Key format (must be sk- + 64 hex, 67 chars total); confirm ANTHROPIC_AUTH_TOKEN is set under the env key in settings.json, or the env var is loaded in the new terminal.
Q: 工具调用失败?Q: Tool use failing?
Claude Code 的工具调用走 Anthropic 原生协议,万能API 已自动映射。如果失败,在 settings.json 加 "ANTHROPIC_TOOL_USE_PROTOCOL": "openai" 切到 OpenAI 兼容协议。Claude Code's tool-use uses Anthropic's native protocol; Universal API maps it automatically. If it fails, add "ANTHROPIC_TOOL_USE_PROTOCOL": "openai" to settings.json to fall back to OpenAI-compatible protocol.
Q: 环境变量设置后没生效?Q: Environment variables set but not taking effect?
macOS / Linux 重新 source ~/.zshrc(或 ~/.bashrc);Windows 用 setx 后必须重开终端,旧窗口不读取注册表新值。如同时有 settings.json 和环境变量,settings.json 优先。macOS / Linux: re-run source ~/.zshrc (or ~/.bashrc); Windows: setx only takes effect in newly opened terminals, not the current one. If both settings.json and env vars are set, settings.json wins.
Q: Node.js 版本太低?Q: Node.js version too old?
Claude Code 1.x 要求 Node.js 18+。用 node -v 查看;如 < 18,去 nodejs.org 装 LTS,或用 nvm 升级:nvm install 20 && nvm use 20。Claude Code 1.x needs Node.js 18+. Check with node -v; if < 18, install LTS from nodejs.org or upgrade via nvm: nvm install 20 && nvm use 20.
Q: 想让不同子任务用不同模型(比如小任务用 haiku、推理用 opus)?Q: Route different sub-tasks to different models (e.g. Haiku for quick tasks, Opus for reasoning)?
在 settings.json 的 env 字段里设 ANTHROPIC_DEFAULT_HAIKU_MODEL、ANTHROPIC_DEFAULT_OPUS_MODEL、ANTHROPIC_DEFAULT_SONNET_MODEL、ANTHROPIC_REASONING_MODEL 五个变量(见 3.4),分别指到万能API 不同的 Claude 模型 ID。如 claude-fable-5 做日常,claude-opus-4-8 做推理,claude-sonnet-4-6 做平衡。Set the five routing vars ANTHROPIC_DEFAULT_HAIKU_MODEL, ANTHROPIC_DEFAULT_OPUS_MODEL, ANTHROPIC_DEFAULT_SONNET_MODEL, ANTHROPIC_REASONING_MODEL, ANTHROPIC_MODEL in settings.json's env field (see 3.4). For example: claude-fable-5 for everyday, claude-opus-4-8 for reasoning, claude-sonnet-4-6 for balanced.
Q: 想让 git commit 不要自动加 Co-Authored-By: Claude?Q: Stop git commits auto-adding Co-Authored-By: Claude?
在 settings.json 顶层加 "includeCoAuthoredBy": false(默认 true)。设 false 后 Claude Code 自己创建的 commit 不再带 Claude 尾签,但不影响你手动加的尾签。Add top-level "includeCoAuthoredBy": false in settings.json (default true). After setting false, commits Claude Code creates itself no longer carry the Claude trailer; manually added trailers are unaffected.
4. Codex 接入4. CodexOpenAI 官方 CLI
Codex 是 OpenAI 官方的命令行编码助手(GitHub openai/codex)。万能API 通过 OpenAI Responses API 协议对接 Codex 的 model provider。本节介绍终端 CLI 形态;桌面 GUI 形态见 16.2 Codex Desktop,CC Switch 多 provider 切换见 18.2 导入 API Key。
Codex is OpenAI's official CLI coding assistant (GitHub openai/codex). Universal API plugs in via the OpenAI Responses API protocol. This section covers the terminal CLI; for the GUI variant see 16.2 Codex Desktop, for CC Switch multi-provider see 18.2 Import API Key.
4.1 前置条件4.1 Prerequisites
- 已注册万能API 账号(注册入口)A registered Universal API account (sign up)
- 已安装 Node.js 18+(
node -v查看)Node.js 18+ installed (check withnode -v) - 当前网络可访问
https://api.wannapi.comNetwork reacheshttps://api.wannapi.com
4.2 安装 Codex CLI4.2 Install Codex CLI
npm install -g @openai/codexmacOS / Linux / WSL / Windows PowerShell / CMD 均适用。安装后 codex --version 验证。Works on macOS / Linux / WSL / Windows PowerShell / CMD. Verify with codex --version.
4.3 在万能API 控制台创建 Codex 专用令牌4.3 Create a Codex-dedicated token
- 登录 wannapi.com → 控制台 → 令牌管理 → 添加令牌Log in to wannapi.com → Console → Token Management → Add Token
- 名称:建议
Codex CLIName:Codex CLI(suggested) - 分组:选含 Codex 常用模型的分组(
MiniMax-M3/gpt-5.5/deepseek-v4-pro等)Group: pick a group containing Codex-favored models (MiniMax-M3/gpt-5.5/deepseek-v4-pro) - 额度:默认Quota: default
- 提交 → 复制密钥(
sk-开头共 67 字符)Submit → Copy Key (sk--prefixed, 67 chars)
4.4 方式一:config.toml 配置(推荐)4.4 Method 1: config.toml (recommended)
编辑 ~/.codex/config.toml(用 nano、vim、code 等任意编辑器;或在安装目录下直接创建):Edit ~/.codex/config.toml (any editor: nano, vim, code; or create it directly under the install dir):
# 全局默认配置# Global default config
model_provider = "wannapi"
model = "MiniMax-M3"   # 默认模型 IDdefault model ID,须确保在万能API 控制台分组中存在模型

# 万能API 模型供应商# Universal API model provider
[model_providers.wannapi]
name = "WNAPI"
base_url = "https://api.wannapi.com/v1"
wire_api = "responses"  # 必须!Codex 走 Responses API# Required! Codex uses Responses API
env_key = "WANNAPI_API_KEY" # 引用环境变量名(不要把 Key 直接写这里)# Reference env var name (do not put the key here directly)base_url: 固定https://api.wannapi.com/v1(必须带/v1,Codex 自己不追加)fixed ashttps://api.wannapi.com/v1(must include/v1; Codex doesn't append it)wire_api = "responses": 必须,Codex 走 Responses API 协议(流式 SSE);改chat会连接错误required; Codex uses Responses API (SSE streaming). Usingchatwill fail with a connection errorenv_key: 环境变量名称,不是 Key 本身。Key 通过 4.5 设置到对应环境变量the env var name, not the Key value. Set the actual Key via4.5
4.5 方式二:环境变量配置(Key 不进 config.toml)4.5 Method 2: environment variable (Key not in config.toml)
config.toml 用 env_key 引用环境变量名,需单独设置 Key。Windows 推荐用 setx:config.toml's env_key references an env var name — set the Key separately. Windows: use setx:
setx WANNAPI_API_KEY "sk-粘贴你的万能API-Keysk-paste your Universal API Key"注意:setx 写注册表,不影响当前窗口——执行后必须关闭并重开新终端。Note: setx writes to the registry and does not affect the current window — close and reopen your terminal after running it.
或 GUI:Win+R → sysdm.cpl → 高级 → 环境变量 → 新建用户变量 WANNAPI_API_KEY,值粘贴 Key,保存后重开所有终端。Or GUI: Win+R → sysdm.cpl → Advanced → Environment Variables → add user variable WANNAPI_API_KEY, paste Key, save, then reopen all terminals.
macOS(zsh,默认 shell):macOS (zsh, default shell):
- 打开"终端"(Terminal)Open Terminal
- 编辑
~/.zshrc(如不存在会自动创建):Edit~/.zshrc(auto-created if missing):
nano ~/.zshrc- 在文件末尾追加这一行(替换
sk-...为你的实际 Key):Append this line at the end (replacesk-...with your actual Key):
export WANNAPI_API_KEY="sk-粘贴你的万能API-Keysk-paste your Universal API Key"- 保存并退出 nano:按
Ctrl + O→ 回车(写入)→Ctrl + X(退出)Save and quit nano:Ctrl + Othen Enter (write), thenCtrl + X(exit) - 立即加载配置:
source ~/.zshrcReload immediately:source ~/.zshrc - 验证:
echo $WANNAPI_API_KEYVerify:echo $WANNAPI_API_KEY
Linux / 旧 macOS(bash):把上面所有 ~/.zshrc 换成 ~/.bashrc(或 ~/.bash_profile,视系统而定),其他命令相同。Linux / older macOS (bash): replace every ~/.zshrc above with ~/.bashrc (or ~/.bash_profile, depending on your system); the rest is identical.
临时设置(仅当前终端会话有效,重启或新窗口失效):直接在命令行 export 即可,无需写文件:Temporary setting (current session only; gone after restart or new window): just export directly, no file edit needed:
export WANNAPI_API_KEY="sk-粘贴你的万能API-Keysk-paste your Universal API Key"4.6 验证4.6 Verify
cd your-project
codex "你好""Hello"
看到中文回复即为配置成功。Codex REPL 内可用 /model MiniMax-M3、/model deepseek-v4-pro、/model claude-fable-5 切换模型。A Chinese reply means success. Inside Codex REPL, switch models with /model MiniMax-M3, /model deepseek-v4-pro, /model claude-fable-5.
4.7 常见问题4.7 FAQ
Q: wire_api 必须是 responses 吗?Q: Must wire_api be responses?
是。当前 Codex 只支持 Responses API 协议,万能API 已自动启用 SSE。改 chat 会连接错误。Yes. Current Codex only supports Responses API; Universal API auto-enables SSE. Using chat will fail with a connection error.
Q: 环境变量配置后没生效?Q: Environment variable set but not taking effect?
Windows 用 setx 后必须重开终端,旧窗口不读取注册表新值;macOS / Linux 用 source ~/.zshrc(或 ~/.bashrc)立即生效。Windows: setx only takes effect in newly opened terminals; macOS / Linux: source ~/.zshrc (or ~/.bashrc) for immediate effect.
Q: 模型切换不生效?Q: Model switch not taking effect?
Codex REPL 内用 /model <name>;启动时用 codex --model <name>;CC Switch 用户改完模型必须重启 CC Switch 和 Codex。In REPL: /model <name>; at launch: codex --model <name>; CC Switch users must restart CC Switch and Codex after model changes.
Q: model not found 报错?Q: model not found error?
确认该模型 ID 在你控制台当前令牌所属分组中存在(详见 #models)。换 key 后分组不继承旧 key 的配置。Confirm the model ID exists in the group your current token belongs to (see #models). New tokens don't inherit group access from old ones.
5. OpenCode 接入5. OpenCode开源终端 AI
OpenCode 是开源终端 AI 编码助手(GitHub sst/opencode),支持多种 LLM 后端。万能API 通过 OpenAI 兼容 provider 接入,使用 AI SDK 协议。本节介绍终端 CLI 形态;桌面 GUI 形态见 16.3 OpenCode Desktop。
OpenCode is an open-source terminal AI coding assistant (GitHub sst/opencode) with multi-LLM support. Universal API plugs in via the OpenAI-compatible provider using the AI SDK protocol. This section covers the terminal CLI; for the GUI variant see 16.3 OpenCode Desktop.
5.1 前置条件5.1 Prerequisites
- 已注册万能API 账号(注册入口)A registered Universal API account (sign up)
- 已安装 Node.js 18+(
node -v查看;或 macOS/Linux 用户有 bash / curl 即可)Node.js 18+ installed (checknode -v) — or just bash + curl on macOS/Linux - Windows 用户需先装 scoop(包管理器)或直接用 npmWindows users: install scoop first, or just use npm
5.2 安装 OpenCode CLI5.2 Install OpenCode CLI
方式一(推荐,macOS / Linux):官方一键安装脚本Method 1 (recommended, macOS / Linux): official install script
curl -fsSL https://opencode.ai/install | bash方式二(Windows scoop):Method 2 (Windows scoop):
scoop install opencode方式三(npm 全平台):Method 3 (npm, cross-platform):
npm install -g opencode-ai任选一种,安装后 opencode --version 验证。Pick any one, then verify with opencode --version.
5.3 在万能API 控制台创建 OpenCode 专用令牌5.3 Create an OpenCode-dedicated token
- 登录 wannapi.com → 控制台 → 令牌管理 → 添加令牌Log in to wannapi.com → Console → Token Management → Add Token
- 名称:
OpenCode CLIName:OpenCode CLI - 分组:选全模型分组(含 Claude / GPT / DeepSeek / MiniMax 等)Group: pick the all-model group (includes Claude / GPT / DeepSeek / MiniMax)
- 提交 → 复制
sk-开头共 67 字符的 KeySubmit → copy thesk--prefixed 67-char Key
5.4 配置 config.json5.4 Configure config.json
编辑 ~/.opencode/config.json:Edit ~/.opencode/config.json:
{
  "$schema": "https://opencode.ai/config.json",
  "provider": {
    "wannapi": {
      "npm": "@ai-sdk/openai-compatible",
      "name": "万能API""name": "Universal API",
      "options": {
        "baseURL": "https://api.wannapi.com/v1",
        "apiKey": "sk-粘贴你的万能API-Keysk-paste your Universal API Key"
      },
      "models": {
        "MiniMax-M3":         { "name": "MiniMax-M3" },
        "deepseek-v4-pro":    { "name": "deepseek-v4-pro" },
        "claude-fable-5":     { "name": "claude-fable-5" },
        "gpt-5.5":            { "name": "gpt-5.5" }
      }
    }
  },
  "model": "wannapi/MiniMax-M3(须确保在万能API 控制台分组中存在模型)(must exist in your Universal API token group)"
}baseURL: 固定https://api.wannapi.com/v1fixed ashttps://api.wannapi.com/v1apiKey: 万能API KeyUniversal API Keymodel: 默认模型,格式<provider>/<model-id>(必须带 provider 前缀)default model, format<provider>/<model-id>(must include provider prefix)models: 在 provider 下显式列出你想用的模型 ID,否则/model切换时列表为空list the model IDs you want under the provider, otherwise/modelhas nothing to switch to
5.5 验证5.5 Verify
opencode
# 在 REPL 里切模型# Inside REPL, switch model
/model wannapi/claude-fable-5
/model wannapi/MiniMax-M3
/model wannapi/deepseek-v4-pro看到正常回复即为成功。A real reply means success.
5.6 常见问题5.6 FAQ
Q: model not found 报错?Q: model not found error?
OpenCode 用 provider/model-id 复合 ID,确保 model 字段写了 wannapi/<model> 而不是只写 <model>。OpenCode uses provider/model-id. Make sure model is wannapi/<model>, not just <model>.
Q: /model 列表是空的?Q: /model list is empty?
必须在 provider.wannapi.models 字段下显式列出每个模型 ID,OpenCode 不会自动发现万能API 后端的所有模型。You must list each model ID under provider.wannapi.models; OpenCode doesn't auto-discover Universal API's full model catalog.
Q: 支持 Function Calling / Tools 吗?Q: Function Calling / Tools supported?
支持。OpenCode 通过 AI SDK 调用 tools,万能API 全模型透传;多模态输入(图像/文件)也支持走 OpenAI 兼容协议。Yes. OpenCode uses the AI SDK for tool use; Universal API passes tools through for all models. Multimodal inputs (images / files) also work via the OpenAI-compatible protocol.
Q: scoop 安装报权限错误?Q: scoop install permission error?
首次用 scoop 需以管理员权限运行 PowerShell 执行 Set-ExecutionPolicy -ExecutionPolicy RemoteSigned -Scope CurrentUser。First-time scoop users: run PowerShell as admin and execute Set-ExecutionPolicy -ExecutionPolicy RemoteSigned -Scope CurrentUser.
6. Gemini CLI 接入6. Gemini CLIGoogle 官方 CLI
Gemini CLI 是 Google 官方的开源终端 AI(GitHub google-gemini/gemini-cli),原生只接 Gemini。万能API 通过 baseUrl 把它指到 OpenAI 兼容端点,模型名映射即可用全模型矩阵。推荐用 CC Switch(图形化、一键切换 Claude/Codex/Gemini 多 provider)—— 详见 18.1 安装 CC Switch。
Gemini CLI is Google's official open-source terminal AI (GitHub google-gemini/gemini-cli). Point it to Universal API's OpenAI-compatible endpoint via baseUrl to use the full model matrix. We recommend CC Switch (GUI multi-provider for Claude/Codex/Gemini) — see 18.1 Install CC Switch.
6.1 前置条件6.1 Prerequisites
- 已注册万能API 账号A registered Universal API account
- Node.js 18+(
node -v查看)Node.js 18+ (checknode -v) - macOS 用户如用 sudo 全局安装 npm 包需准备用户密码macOS users: have your user password ready if installing npm packages globally with sudo
6.2 安装 Gemini CLI6.2 Install Gemini CLI
npm install -g @google/gemini-climacOS 全局安装如报 EACCES 权限错误,加 sudo:macOS EACCES error? Prefix with sudo:
sudo npm install -g @google/gemini-cli安装后 gemini --version 验证。Verify with gemini --version.
6.3 在万能API 控制台创建 Gemini 专用令牌6.3 Create a Gemini-CLI-dedicated token
- 登录 wannapi.com → 控制台 → 令牌管理 → 添加令牌Log in to wannapi.com → Console → Token Management → Add Token
- 名称:
Gemini CLIName:Gemini CLI - 分组:含
claude-fable-5/MiniMax-M3/deepseek-v4-pro的全模型分组Group: the all-model group containingclaude-fable-5/MiniMax-M3/deepseek-v4-pro - 提交 → 复制
sk-开头共 67 字符的 KeySubmit → copy thesk--prefixed 67-char Key
6.4 方式一:CC Switch 配置(推荐 GUI 路径)6.4 Method 1: CC Switch (recommended GUI path)
CC Switch 是开源桌面应用(GitHub farion1231/cc-switch,Rust + Tauri,约 6MB),跨 Windows / macOS / Linux,可在 Claude Code / Codex / Gemini CLI / OpenCode 之间一键切换 provider。CC Switch is an open-source desktop app (GitHub farion1231/cc-switch, Rust + Tauri, ~6MB), cross-platform Windows / macOS / Linux, switches providers between Claude Code / Codex / Gemini CLI / OpenCode in one click.
- 下载:GitHub Releases 找对应系统的安装包并安装Download: GitHub Releases, pick the installer for your OS
- 打开 CC Switch,点击顶栏 Gemini 图标Open CC Switch, click the Gemini icon in the top toolbar
- 点右上角 加号 → 选 自定义供应商Click the + in the upper-right → pick Custom Provider
- 按 #models 提供的万能API 字段填:Fill Universal API fields from #models:
| 字段Field | 值Value |
|---|---|
Name | 万能API |
Base URL | https://api.wannapi.com/v1 |
API Key | sk-粘贴你的万能API-Keysk-paste your Universal API Key |
Model | MiniMax-M3 或 claude-fable-5 / deepseek-v4-pro 等or claude-fable-5 / deepseek-v4-pro etc. (须确保在万能API 控制台分组中存在模型must exist in your Universal API token group) |
- 保存 → 关掉再开终端Save → close and reopen your terminal
6.5 方式二:settings.json 直接配置(不依赖 CC Switch)6.5 Method 2: settings.json (without CC Switch)
编辑 ~/.gemini/settings.json:Edit ~/.gemini/settings.json:
{
  "apiKey": "sk-粘贴你的万能API-Keysk-paste your Universal API Key",
  "baseUrl": "https://api.wannapi.com/v1",
  "model": "MiniMax-M3"
}apiKey: 万能API Key(sk-开头共 67 字符)Universal API Key (sk--prefixed, 67 chars)baseUrl: 覆盖 Google 默认端点,指向万能APIoverrides Google's default endpoint, points to Universal APImodel: 万能API 任意模型 ID(MiniMax-M3/claude-fable-5/deepseek-v4-pro)any Universal API model ID
6.6 验证6.6 Verify
gemini "用 Python 写一个斐波那契函数"看到正常 Python 代码回复即为配置成功。A correct Python code reply means success.
6.7 常见问题6.7 FAQ
Q: baseUrl 不生效?Q: baseUrl not respected?
旧版 Gemini CLI 用 GEMINI_API_BASE 环境变量;新版才认 settings.json 的 baseUrl。npm update -g @google/gemini-cli 升级到最新。Older versions use the GEMINI_API_BASE env var; only newer versions honor baseUrl in settings.json. Run npm update -g @google/gemini-cli to upgrade.
Q: CC Switch 找不到 Gemini 图标?Q: No Gemini icon in CC Switch?
CC Switch 3.12+ 才支持 Gemini CLI;如果版本 < 3.12,去 Releases 升级,或用方式二(settings.json)。Gemini CLI support landed in CC Switch 3.12+; if your version is older, upgrade from Releases or use Method 2 (settings.json).
Q: 工具调用 / MCP 不工作?Q: Tool use / MCP not working?
Gemini CLI 的 MCP 配置仍然走 Google 协议。万能API 已通过 OpenAI 兼容层做了适配;如果个别 MCP server 失败,把它换成 OpenAI Function Calling 风格的即可。Gemini CLI's MCP config still uses Google's protocol. Universal API adapts via the OpenAI-compatible layer; if a specific MCP server fails, switch it to OpenAI Function Calling style.
Q: macOS EACCES 权限错误?Q: macOS EACCES permission error?
全局 npm 安装默认写到 /usr/local/lib/node_modules,需要 sudo。长期方案:把全局目录改成 ~/.npm-global(npm config set prefix '~/.npm-global' + 加 PATH),就不用每次 sudo。Global npm install writes to /usr/local/lib/node_modules, requiring sudo. Long-term fix: change npm prefix to ~/.npm-global (npm config set prefix '~/.npm-global' + add to PATH) so sudo isn't needed.
7. OpenClaw 接入7. OpenClaw开源 AI 代理
OpenClaw 是开源 AI 代理 CLI(GitHub openclaw/openclaw),支持 Custom Provider 直连 OpenAI 兼容端点。万能API 直接对接,无需额外适配,URL 选择带不带 /v1 都可识别。
OpenClaw is an open-source AI agent CLI (GitHub openclaw/openclaw) with Custom Provider support for any OpenAI-compatible endpoint. Universal API plugs in directly — the URL works with or without /v1.
7.1 前置条件7.1 Prerequisites
- 已注册万能API 账号A registered Universal API account
- Node.js 24+(OpenClaw 要求较高,
node -v查看)Node.js 24+ (OpenClaw requires recent Node; checknode -v) - Linux / macOS / WSL 推荐用 bash;Windows 用 PowerShellLinux / macOS / WSL: bash; Windows: PowerShell
7.2 安装 OpenClaw7.2 Install OpenClaw
方式一(推荐):npm 全局安装Method 1 (recommended): npm global install
npm install -g openclaw方式二:一键安装脚本(Linux / macOS / WSL)Method 2: one-liner script (Linux / macOS / WSL)
curl -fsSL https://openclaw.ai/install.sh | bash任选一种,安装后 openclaw --version 验证。Pick any one, then verify with openclaw --version.
7.3 在万能API 控制台创建 OpenClaw 专用令牌7.3 Create an OpenClaw-dedicated token
- 登录 wannapi.com → 控制台 → 令牌管理 → 添加令牌Log in to wannapi.com → Console → Token Management → Add Token
- 名称:
OpenClawName:OpenClaw - 分组:含 Claude 全模型 + DeepSeek 等;如果是 Claude 专用且只走 Anthropic 协议,选择对应的协议分组Group: full Claude + DeepSeek etc.; if Claude-only with Anthropic protocol, pick the matching protocol group
- 提交 → 复制
sk-开头共 67 字符的 KeySubmit → copy thesk--prefixed 67-char Key
7.4 配置 OpenClaw(onboard 引导)7.4 Configure OpenClaw (onboard wizard)
openclaw onboard --install-daemon交互式引导,按提示选:Follow the interactive prompts:
- 选 QuickStart(快速启动)Pick QuickStart
- Model / auth provider 选 Custom ProviderModel / auth provider: pick Custom Provider
- API Base URL 填
https://api.wannapi.com(不带 /v1,OpenClaw 兼容)API Base URL:https://api.wannapi.com(without /v1; OpenClaw accepts both) - 粘贴万能API KeyPaste your Universal API Key
- 兼容端点:除了 Claude 选择第二个(Anthropic),其他一般选 OpenAI 兼容Compatibility: pick OpenAI-compatible unless you specifically need Anthropic protocol (Claude only)
- 模型名称:从万能API 控制台模型列表复制(如
claude-fable-5/MiniMax-M3)(须确保在万能API 控制台分组中存在模型)Model name: copy from the Universal API model catalog (e.g.claude-fable-5/MiniMax-M3) (must exist in your Universal API token group) - 验证成功 → 选择 Web UI 作为交互形态Verify succeeds → pick Web UI as the interaction mode
- 后续提示全部选"跳过"Skip all remaining prompts
7.5 验证7.5 Verify
openclaw gateway run网关跑起来后,新终端开 dashboard:With the gateway running, launch the dashboard in another terminal:
openclaw dashboard浏览器打开提示的 URL,在 Web UI 里发个消息,看到回复即为成功。Open the printed URL in a browser, send a test message, and confirm a real reply.
7.6 常见问题7.6 FAQ
Q: 连通性验证失败?Q: Connectivity check failed?
99% 的情况是 URL 没加 /v1。万能API 默认端点 https://api.wannapi.com(不带 /v1)即可;如果坚持用 OpenAI 兼容端点可填 https://api.wannapi.com/v1。两者都识别。99% of the time it's a missing/extra /v1. Universal API accepts both https://api.wannapi.com (default) and https://api.wannapi.com/v1 (OpenAI-compatible).
Q: Web UI 提示"上下文窗口过小"?Q: Web UI warns "context window too small"?
编辑 ~/.openclaw/openclaw.json,在 models 里给目标模型调大 contextWindow 和 maxTokens(如 200000 / 8192)。Edit ~/.openclaw/openclaw.json and bump contextWindow and maxTokens on the target model (e.g. 200000 / 8192).
Q: openclaw dashboard 打不开?Q: openclaw dashboard won't open?
确认 openclaw gateway run 在另一个终端/后台进程里跑着;dashboard 是 gateway 的 Web UI,gateway 没起就不会响应。生产环境可用 systemd / pm2 / Windows 服务守护 gateway。Confirm openclaw gateway run is running in another terminal / background process; the dashboard is the gateway's Web UI, so it won't respond without the gateway. In production, daemonize the gateway with systemd / pm2 / a Windows service.
Q: Claude 协议没识别?Q: Claude protocol not recognized?
选 Custom Provider 后,下一步会问兼容端点 —— 如果是 Claude 用法,选第二个 Anthropic 协议而不是 OpenAI 兼容。After picking Custom Provider, the next prompt asks for the compatibility endpoint — for Claude, pick Anthropic protocol (the second option), not OpenAI-compatible.
8. Dify 接入8. DifyLLM 应用平台
Dify 是开源 LLM 应用开发平台(GitHub langgenius/dify),内置"OpenAI-API-compatible"模型供应商类型。万能API 直接对接,无需写代码;在 Dify 控制台添加供应商 → 填万能API 字段 → 在 Chatflow / Workflow 里选用即可。
Dify is an open-source LLM app platform (GitHub langgenius/dify) with a built-in "OpenAI-API-compatible" provider type. Universal API plugs in with no code: add a provider in the Dify console, fill in Universal API fields, and pick the model in your Chatflow / Workflow.
8.1 前置条件8.1 Prerequisites
- 已注册万能API 账号A registered Universal API account
- 已装 Docker 20.10+ + Docker Compose v2(
docker --version+docker compose version查看)Docker 20.10+ + Docker Compose v2 installed (checkdocker --version+docker compose version) - 至少 2 vCPU + 4GB RAM(Dify 默认配置要求)At least 2 vCPU + 4GB RAM (Dify minimum)
8.2 安装 Dify(Docker 部署)8.2 Install Dify (Docker)
git clone https://github.com/langgenius/dify.git
cd dify/docker
cp .env.example .env
docker compose up -d
启动后浏览器访问 http://localhost/install 完成初始化(设管理员账号)。After startup, visit http://localhost/install for first-run initialization (set admin account).
8.3 在万能API 控制台创建 Dify 专用令牌8.3 Create a Dify-dedicated token
- 登录 wannapi.com → 控制台 → 令牌管理 → 添加令牌Log in to wannapi.com → Console → Token Management → Add Token
- 名称:
DifyName:Dify - 分组:选含你要在 Dify 里用的模型的分组Group: pick a group containing the models you want inside Dify
- 提交 → 复制
sk-开头共 67 字符的 KeySubmit → copy thesk--prefixed 67-char Key
8.4 配置 Dify 控制台(添加万能API 模型)8.4 Configure Dify console (add Universal API model)
- 登录 Dify → 右上角个人中心 → 设置Sign in to Dify → top-right avatar → Settings
- 左侧栏点 模型供应商 → 在右侧模型列表找 OpenAI-API-compatible → 点击添加Left sidebar → Model Providers → in the right list find OpenAI-API-compatible → click Add
- 模型类型选 LLM,按下面字段填:Model type: LLM; fill in the following fields:
| 字段Field | 值Value |
|---|---|
Model Name | MiniMax-M3 或 claude-fable-5 / deepseek-v4-pro 等or claude-fable-5 / deepseek-v4-pro etc. (须确保在万能API 控制台分组中存在模型must exist in your Universal API token group) |
API Key | sk-粘贴你的万能API-Keysk-paste your Universal API Key |
API endpoint URL | https://api.wannapi.com/v1 |
Completion Mode | ChatChat |
- 点保存 → 模型列表里能看到新加的模型即配置成功Save → confirm the new model shows up in the list
dify/docker/.env 的 OPENAI_API_COMPATIBLE_MODELS(社区版支持 model1,model2,model3 格式),重启 docker compose up -d 后一次性生效。Dify shows one model at a time in the UI. To batch-add, edit OPENAI_API_COMPATIBLE_MODELS in dify/docker/.env (community edition supports model1,model2,model3 format), then docker compose up -d.
8.5 在 Dify 工作流中使用万能API 模型8.5 Use Universal API models inside Dify
按下面三步把万能API 模型接到 Dify 工作流:Plug Universal API into a Dify workflow in three steps:
- 顶部菜单 → 工作室 → 右上角 创建空白应用 → 选 Chatflow(对话流)或 Workflow(工作流)Top menu → Studio → top-right Create Blank App → pick Chatflow or Workflow
- 在画布里添加一个 LLM 节点 → 节点右上角的"模型"下拉框选择 万能API / MiniMax-M3(如 8.4 一次性加了多个模型,这里能看到所有可选项)On the canvas, add an LLM node → in the node's top-right model dropdown, pick Universal API / MiniMax-M3 (if you batch-added models per 8.4, they'll all appear here)
- 在 SYSTEM / USER 提示词框里填测试 prompt → 右上角 运行(▶)→ 下方"运行结果"区域显示模型回复即为成功Fill test prompts in the SYSTEM / USER boxes → click Run (▶) in the top-right → the model's reply appears in the "Output" panel below
8.6 常见问题8.6 FAQ
Q: invalid api key 报错?Q: invalid api key error?
Dify 在某些版本会把 Bearer 前缀重复添加,导致 Bearer Bearer sk-...。升级到 Dify 1.0+ 已修复。Some Dify versions double-prefix Bearer and send Bearer Bearer sk-.... Fixed in Dify 1.0+.
Q: 流式响应断开?Q: Streaming breaks mid-response?
Dify 默认 SSE 60s 超时。万能API 长上下文模型(MiniMax-M3 1M)首字可能慢一些,把 Dify 的 WORKFLOW_TIMEOUT 调到 600s(dify/docker/.env)。Dify's default SSE timeout is 60s. Universal API long-context models (MiniMax-M3 1M) may need a slow first token — bump WORKFLOW_TIMEOUT to 600s in dify/docker/.env.
Q: API endpoint URL 填什么?Q: What URL goes in "API endpoint URL"?
填 https://api.wannapi.com/v1(带 /v1)。Dify 会自动追加 /chat/completions。如不带 /v1,新版 Dify 会自动补;带 /v1 更明确。Use https://api.wannapi.com/v1 (with /v1); Dify appends /chat/completions. Newer Dify versions auto-add /v1 if missing.
Q: Dify 不在本地,部署在内网/云服务器呢?Q: What if Dify runs on a private network or cloud VM?
同 8.4 表里的 API endpoint URL 一样填万能API 公网地址;只要 Dify 服务器能访问 https://api.wannapi.com 即可,无需在万能API 侧做任何内网映射。Use the same public Universal API URL as in 8.4; as long as the Dify host can reach https://api.wannapi.com, no private-network mapping is needed.
9. n8n 接入9. n8n工作流自动化
n8n 是开源工作流自动化工具(n8n.io),把万能API 作为 LLM 节点接入 AI Agent / Chain,或作为 HTTP API 接入任意工作流。本节同时介绍两种接入路径。 n8n is an open-source workflow automation tool (n8n.io). Connect Universal API as an LLM node inside AI Agents / Chains, or as an HTTP API in any workflow. This section covers both paths.
9.1 前置条件9.1 Prerequisites
- 已注册万能API 账号A registered Universal API account
- Node.js 18+(npm 本地部署用)或 Docker 20.10+(生产用)Node.js 18+ (npm local) or Docker 20.10+ (production)
- 浏览器可访问
http://localhost:5678Browser access tohttp://localhost:5678
9.2 安装 n8n9.2 Install n8n
方式一(npm 本地试用):Method 1 (npm, local trial):
npm install -g n8n
n8n start
方式二(Docker 推荐生产):Method 2 (Docker, recommended for prod):
docker run -it --rm \
  --name n8n -p 5678:5678 \
  -v ~/.n8n:/home/node/.n8n \
  n8nio/n8n
任选一种,浏览器访问 http://localhost:5678,首次进入注册账号。Pick either; visit http://localhost:5678 and register an account on first run.
9.3 在万能API 控制台创建 n8n 专用令牌9.3 Create an n8n-dedicated token
- 登录 wannapi.com → 控制台 → 令牌管理 → 添加令牌Log in to wannapi.com → Console → Token Management → Add Token
- 名称:
n8nName:n8n - 分组:含你要在 workflow 里调用的模型(如
MiniMax-M3/claude-fable-5/gpt-5.5)Group: contains the models you'll call in workflows (MiniMax-M3/claude-fable-5/gpt-5.5) - 提交 → 复制
sk-开头共 67 字符的 KeySubmit → copy thesk--prefixed 67-char Key
9.4 方式一:添加账户凭证(OpenAI 兼容)9.4 Method 1: Add a credential (OpenAI-compatible)
- 左侧栏点 Overview → 顶部 Credential → Add CredentialLeft sidebar → Overview → top Credential → Add Credential
- 搜索
OpenAI→ 选 OpenAI 类型SearchOpenAI→ pick the OpenAI type - 填字段:Fill fields:
| 字段Field | 值Value |
|---|---|
API Key | sk-粘贴你的万能API-Keysk-paste your Universal API Key |
Base URL | https://api.wannapi.com/v1 |
Organization | 留空leave blank |
- 保存 → 出现"Connection tested successfully"即为凭证可用Save → "Connection tested successfully" means the credential works
9.5 方式二:HTTP Request 节点(兜底)9.5 Method 2: HTTP Request node (fallback)
如果不用凭证 / 想自定义更多请求细节,直接在画布里加一个 HTTP Request 节点:If you don't want to use a credential or need finer control, drop an HTTP Request node directly on the canvas:
- 新建 workflow → 选 手动触发 作为起始节点New workflow → pick Manual Trigger as the start node
- 添加 HTTP Request 节点,按下面配置:Add an HTTP Request node with this config:
| 字段Field | 值Value |
|---|---|
Method | POST |
URL | https://api.wannapi.com/v1/chat/completions |
Headers | Authorization: Bearer sk-粘贴你的万能API-Keysk-paste your Universal API KeyContent-Type: application/json |
Body (JSON) | { "model": "MiniMax-M3", "messages": [{ "role": "user", "content": "={{$json.prompt}}" }] } |
- 点节点上的 Execute step → 右侧 OUTPUT 看到模型回复即为成功Click Execute step on the node → if the right-side OUTPUT shows a model reply, you're good
9.6 验证9.6 Verify
方式一(凭证):画布里加一个 AI Agent → 子节点用 OpenAI Chat Model(绑定上面凭证)→ 手动触发 → 看输出含模型回复。Method 1 (credential): add an AI Agent → LLM sub-node = OpenAI Chat Model bound to the credential above → Manual Trigger → confirm the model replies.
方式二(HTTP Request):在 Manual Trigger 节点的 JSON 里设 prompt = "你好""Hello" → 点 Execute Workflow → HTTP Request 节点右侧 OUTPUT 含中文回复。Method 2 (HTTP Request): set prompt = "Hello" in the Manual Trigger's JSON → click Execute Workflow → confirm the HTTP Request node outputs a real reply.
9.7 生图工作流节点配置9.7 Image-gen workflow node
想用万能API 的生图模型(如 gpt-image-1.5、MiniMax-M3 多模态等),加一个 HTTP Request 节点,URL 切换到 /v1/images/generations 端点:To call Universal API's image-gen models (gpt-image-1.5, multimodal MiniMax-M3, etc.), add an HTTP Request node pointing to the /v1/images/generations endpoint:
- 在 workflow 里新增一个 HTTP Request 节点Add an HTTP Request node to the workflow
- 按下表配置字段:Configure the fields below:
| 字段Field | 值Value |
|---|---|
Method | POST |
URL | https://api.wannapi.com/v1/images/generations |
Headers | Authorization: Bearer sk-粘贴你的万能API-Keysk-paste your Universal API KeyContent-Type: application/json |
Body (JSON) | { "model": "<image-model-id>", "prompt": "a white siamese cat", "n": 1, "size": "1024x1024" } |
- 点 Execute step 触发测试 → 节点 OUTPUT 含
data[0].url,即图片链接Click Execute step to test → the node's OUTPUT includesdata[0].url, the image link - 把链接接一个 Respond to Webhook 节点返回,或用 HTTP Request 节点把图片下载下来转给下游节点(如存 OSS / 发邮件)Feed the link to a Respond to Webhook node, or download it via another HTTP Request node and pass it downstream (OSS / email / etc.)
data[0].url 默认是临时链接(约 1 小时过期);生产环境请在万能API 控制台绑定自己的 CDN / OSS 域名,或用 n8n Function 节点在拿到 URL 后立即下载转存。data[0].url is a temporary link by default (expires in ~1 hour); for production, bind your own CDN / OSS domain in the Universal API console, or use an n8n Function node to download and re-host the image as soon as the URL comes back.
9.8 常见问题9.8 FAQ
Q: 找不到 OpenAI Chat Model 节点?Q: OpenAI Chat Model node not found?
n8n 1.0+ 把 OpenAI 节点纳入 AI 套件,需要在画布里加 AI Agent / Chain 节点才能在子节点里看到 OpenAI Chat Model;老版本(< 1.0)请用方式二(HTTP Request)。n8n 1.0+ ships OpenAI Chat Model as a sub-node inside AI Agent / Chain; older versions (< 1.0) must use Method 2 (HTTP Request).
Q: Webhook 触发 + 流式输出怎么配?Q: Webhook + streaming output?
HTTP Request 节点不支持 SSE 透传;要用流式,先经过一个 Function 节点把响应切块,再用 Respond to Webhook 节点逐块返回;或直接换用 OpenAI Chat Model 子节点(其内部已封装流式)。The HTTP Request node doesn't pass SSE through. For streaming, chunk the response in a Function node, then return chunks via Respond to Webhook; or use the OpenAI Chat Model sub-node (which handles streaming internally).
Q: Bearer header 报 401?Q: Bearer header returns 401?
确认 Key 格式(sk- + 64 hex = 67 字符);在 Headers 里 Authorization 字段值必须是 Bearer <空格> sk-...,不要重复 Bearer 前缀。Confirm Key format (sk- + 64 hex, 67 chars); the Authorization header value must be Bearer <space> sk-..., not double-prefixed Bearer.
10. ComfyUI 接入10. ComfyUIAI 图像生成
ComfyUI 是节点式 Stable Diffusion 工作流(GitHub comfyanonymous/ComfyUI)。通过 ComfyUI-OpenAI-API 第三方扩展,把万能API 作为云端 LLM 节点接入(用于 prompt 润色 / 视觉问答 / 多模态理解)。本地 SD 出图仍然走 ComfyUI 原生 checkpoints。
ComfyUI is a node-based Stable Diffusion UI (GitHub comfyanonymous/ComfyUI). Use the ComfyUI-OpenAI-API third-party extension to plug Universal API as a cloud LLM node (for prompt polishing / VQA / multimodal). Local SD generation still uses native ComfyUI checkpoints.
10.1 前置条件10.1 Prerequisites
- 已注册万能API 账号A registered Universal API account
- 已装 Python 3.10+(
python --version查看)Python 3.10+ installed (checkpython --version) - 已装 ComfyUI 本体(含 GPU 推理环境)ComfyUI itself installed (with GPU inference ready)
- 已装 GitGit installed
10.2 安装 ComfyUI-OpenAI-API 扩展10.2 Install ComfyUI-OpenAI-API extension
cd ComfyUI/custom_nodes
git clone https://github.com/ComfyUI-OpenAI-API/ComfyUI-OpenAI-API.git
cd ComfyUI-OpenAI-API
pip install -r requirements.txt
如 pip install 报权限错误,用 pip install --user -r requirements.txt 或在 venv 内安装(推荐)。If pip install reports permission errors, use pip install --user -r requirements.txt or install inside a venv (recommended).
10.3 在万能API 控制台创建 ComfyUI 专用令牌10.3 Create a ComfyUI-dedicated token
- 登录 wannapi.com → 控制台 → 令牌管理 → 添加令牌Log in to wannapi.com → Console → Token Management → Add Token
- 名称:
ComfyUIName:ComfyUI - 分组:含
MiniMax-M3(多模态)/claude-fable-5(长上下文分镜)/gpt-5.5(SDXL prompt 润色)Group: containsMiniMax-M3(multimodal) /claude-fable-5(long-context storyboard) /gpt-5.5(SDXL prompt polish) - 提交 → 复制
sk-开头共 67 字符的 KeySubmit → copy thesk--prefixed 67-char Key
10.4 配置 config.yaml10.4 Configure config.yaml
编辑 ComfyUI/custom_nodes/ComfyUI-OpenAI-API/config.yaml:Edit ComfyUI/custom_nodes/ComfyUI-OpenAI-API/config.yaml:
providers:
  wannapi:
    base_url: "https://api.wannapi.com/v1"
    api_key: "sk-粘贴你的万能API-Keysk-paste your Universal API Key"
    models:
      - "MiniMax-M3"
      - "claude-fable-5"
      - "gpt-5.5"

default_provider: wannapi
default_model: MiniMax-M3(须确保在万能API 控制台分组中存在模型)(must exist in your Universal API token group)- 把英文 prompt 用
gpt-5.5润色成 SDXL 友好风格Polish raw English prompts into SDXL-friendly style withgpt-5.5 - 用
MiniMax-M3(多模态)做"图生文"反推 captionReverse-caption an image withMiniMax-M3(multimodal) - 用
claude-fable-5长上下文做"漫画分镜脚本"Long-context storyboard scripting withclaude-fable-5
10.5 验证10.5 Verify
重启 ComfyUI(不是浏览器刷新),画布里拖一个 OpenAI Chat 节点,model 选 MiniMax-M3,接一个 Text Output,运行:Restart ComfyUI (not just the browser), drop an OpenAI Chat node, pick MiniMax-M3, attach a Text Output, and run:
"用一段话描述赛博朋克雨夜街景""Describe a cyberpunk rainy street scene in one paragraph"Text Output 显示中文/英文描述即配置成功。The Text Output showing the description means success.
10.6 常见问题10.6 FAQ
Q: 想用 ComfyUI 自带的 SDXL 出图,又想用万能API 润色 prompt?Q: I want SDXL local generation AND Universal API prompt polish?
完全可以。两个节点系统并存:本地 SDXL checkpoint 节点 + 云端 LLM 节点串联,前者出图,后者改 prompt。Yes — chain a local SDXL checkpoint node with a cloud LLM node; one generates, the other rewrites prompts.
Q: 节点列表里没有 OpenAI Chat?Q: OpenAI Chat node missing?
重启 ComfyUI(不是浏览器刷新)。ComfyUI 在启动时扫描 custom_nodes;新增节点需重启才能识别。Restart ComfyUI (not just the browser). ComfyUI scans custom_nodes at startup; new nodes require a restart to be registered.
Q: pip install 报 externally-managed-environment?Q: pip install complains about externally-managed-environment?
新版 Python(PEP 668)默认禁止系统级 pip 装包。推荐用 venv:python -m venv venv && source venv/bin/activate(Windows:venv\Scripts\activate)后再 pip install -r requirements.txt。Recent Python (PEP 668) blocks system-wide pip installs. Use a venv: python -m venv venv && source venv/bin/activate (Windows: venv\Scripts\activate), then pip install -r requirements.txt.
Q: base_url 填 /v1 还是不带?Q: base_url with or without /v1?
本扩展按 OpenAI 兼容协议设计,必须带 /v1(https://api.wannapi.com/v1)。不带 /v1 会 404。This extension follows the OpenAI-compatible protocol, so include /v1 (https://api.wannapi.com/v1). Without it you'll get 404.
11. API 参考11. API Reference
11.1 基础信息11.1 Base info
| 项Item | 值Value |
|---|---|
| 基础 URLBase URL | https://api.wannapi.com/v1 |
| 协议Protocol | OpenAI 兼容 + Responses APIOpenAI-compatible + Responses API |
| 认证Auth | Authorization: Bearer sk-... |
| 流式Streaming | SSE (Server-Sent Events) |
| 超时Timeout | 默认 60s,长上下文模型建议 600s60s default, 600s for long-context models |
11.2 Chat Completions11.2 Chat Completions
POST https://api.wannapi.com/v1/chat/completions
Content-Type: application/json
Authorization: Bearer sk-xxxxxxxx

{
  "model": "gpt-5.4",
  "messages": [
    { "role": "system", "content": "You are a helpful assistant." },
    { "role": "user",   "content": "Hello" }
  ],
  "temperature": 0.7,
  "max_tokens": 2048,
  "stream": false
}
11.3 流式响应 (SSE)11.3 Streaming (SSE)
设 "stream": true,响应按 data: {...}\n\n 逐块返回,结束标记 data: [DONE]。Set "stream": true. Response arrives as data: {...}\n\n chunks, terminated by data: [DONE].
11.4 Function Calling11.4 Function Calling
{
  "model": "gpt-5.5",
  "messages": [...],
  "tools": [
    {
      "type": "function",
      "function": {
        "name": "get_weather",
        "description": "Get current weather",
        "parameters": {
          "type": "object",
          "properties": { "city": { "type": "string" } },
          "required": ["city"]
        }
      }
    }
  ],
  "tool_choice": "auto"
}
11.5 8 客户端代码示例11.5 Code examples (8 clients)
Python (OpenAI SDK)Python (OpenAI SDK)
from openai import OpenAI

client = OpenAI(
    base_url="https://api.wannapi.com/v1",
    api_key="sk-你的万能API-Keysk-your-Universal-API-Key",
)

resp = client.chat.completions.create(
    model="gpt-5.4",
    messages=[{"role": "user", "content": "你好""Hello"}],
)
print(resp.choices[0].message.content)
Node.js (OpenAI SDK)Node.js (OpenAI SDK)
import OpenAI from "openai";
const client = new OpenAI({
  baseURL: "https://api.wannapi.com/v1",
  apiKey: "sk-你的万能API-Keysk-your-Universal-API-Key",
});
const r = await client.chat.completions.create({
  model: "gpt-5.4",
  messages: [{ role: "user", content: "你好""Hello" }],
});
console.log(r.choices[0].message.content);cURLcURL
curl https://api.wannapi.com/v1/chat/completions \
  -H "Authorization: Bearer sk-你的万能API-Keysk-your-Universal-API-Key" \
  -H "Content-Type: application/json" \
-d '{"model":"gpt-5.4","messages":[{"role":"user","content":"hi""hi"}]}'GoGo
client := openai.NewClient(
    option.WithAPIKey("sk-你的万能API-Keysk-your-Universal-API-Key"),
    option.WithBaseURL("https://api.wannapi.com/v1"),
)
resp, _ := client.Chat.Completions.New(ctx, openai.ChatCompletionNewParams{
    Model: openai.F(openai.ChatModelGPT5Mini),
    Messages: openai.F([]openai.ChatCompletionMessageParamUnion{
        openai.UserMessage("你好""Hello"),
    }),
})JavaJava
OpenAIClient client = OpenAIOkHttpClient.builder()
    .baseUrl("https://api.wannapi.com/v1")
    .apiKey("sk-你的万能API-Keysk-your-Universal-API-Key")
    .build();

ChatCompletionCreateParams params = ChatCompletionCreateParams.builder()
    .model(ChatModel.GPT_5_MINI)
    .addUserMessage("你好""Hello")
    .build();

client.chat().completions().create(params);PHPPHP
$client = OpenAI::client('sk-你的万能API-Keysk-your-Universal-API-Key')
    ->withBaseUri('https://api.wannapi.com/v1');
$response = $client->chat()->create([
    'model' => 'gpt-5.4',
    'messages' => [['role' => 'user', 'content' => '你好Hello']],
]);RubyRuby
client = OpenAI::Client.new(
  access_token: "sk-你的万能API-Keysk-your-Universal-API-Key",
  uri_base: "https://api.wannapi.com/v1"
)
client.chat(parameters: { model: "gpt-5.4", messages: [{ role: "user", content: "你好""Hello" }] })
TypeScript (Streaming)TypeScript (Streaming)
const stream = await client.chat.completions.create({
  model: "gpt-5.4",
  messages: [{ role: "user", content: "你好""Hello" }],
  stream: true,
});
for await (const chunk of stream) {
  process.stdout.write(chunk.choices[0]?.delta?.content ?? "");
}
12. 已接入模型12. Available Models
万能API 大模型持续上线中,下表是常用模型 ID:Universal API: large models continuously rolling out. Commonly used IDs:
⚠️ 本节「套餐」真实收费:付费 ¥99 BASIC / ¥999 ENTERPRISE → 公司账(不进账户余额),立即得赠送余额 ¥1 / ¥10 进账户。订阅按月度续费(periodEnd = +1 月),每天 08:00 CST cron 自动从余额扣套餐费 + 补赠送;余额不足进 3 天宽限期(GRACE,可用),过期未续 → EXPIRED 暂停。赠送余额用完可充值 /dashboard/recharge 或再买套餐叠加。⚠️ Real billing here: Pay ¥99 BASIC / ¥999 ENTERPRISE → company account (NOT credited to User.balance); get ¥1 / ¥10 bonus added instantly. Subscription renews monthly (periodEnd = +1 month); every day 08:00 CST cron auto-deducts plan fee + tops up bonus. Low balance → 3-day GRACE (still usable); expired unpaid → EXPIRED (service paused). Top up at /dashboard/recharge or stack another plan.
📌 本页列出 26 个主力模型。另有 13 个兼容路由(GPT-4o / Claude 3.5 / 智谱 GLM-4 等)供老用户迁移期使用。📌 This page lists 26 flagship models. 13 legacy routes (GPT-4o, Claude 3.5, Zhipu GLM-4, etc.) also work for existing users during migration.
model: "agnes-2.0-flash",上下文 512M,0 token / 0 元,不消耗账户余额。Agnes AI's official free model. Use model: "agnes-2.0-flash" directly in Universal API chat completions — 512M context, zero tokens, zero cost, no account balance consumed.
| 模型 IDModel ID | 厂商Provider | 上下文Context | 输入/输出Input / Output | 使用场景Use Cases | ||||||||||||||||||||||||||||||||||||||||||||||||||||||||||||||||||||||||||||||||||||||||||
|---|---|---|---|---|---|---|---|---|---|---|---|---|---|---|---|---|---|---|---|---|---|---|---|---|---|---|---|---|---|---|---|---|---|---|---|---|---|---|---|---|---|---|---|---|---|---|---|---|---|---|---|---|---|---|---|---|---|---|---|---|---|---|---|---|---|---|---|---|---|---|---|---|---|---|---|---|---|---|---|---|---|---|---|---|---|---|---|---|---|---|---|---|---|---|
agnes-2.0-flash |
AgnesAgnes | 512M512M | 🟢 免费🟢 Free | 免费快速响应 / 原型测试 / 轻量问答free fast response / prototype / lightweight Q&A | ||||||||||||||||||||||||||||||||||||||||||||||||||||||||||||||||||||||||||||||||||||||||||
gpt-5.5 |
OpenAIOpenAI | 1.05M1.05M | $5/$30 (官网)$5/$30 (official) | 代码重构 / 多文件协同 / 复杂推理code refactor / multi-file / complex reasoning | ||||||||||||||||||||||||||||||||||||||||||||||||||||||||||||||||||||||||||||||||||||||||||
gpt-5.6-sol |
OpenAIOpenAI | 256K256K | $5/$30 (官网 frontier)$5/$30 (official frontier) | 旗舰通用 / 复杂推理 / 多模态助手flagship / complex reasoning / multimodal assistant | ||||||||||||||||||||||||||||||||||||||||||||||||||||||||||||||||||||||||||||||||||||||||||
gpt-5.6-terra |
OpenAIOpenAI | 256K256K | $2/$12 (官网 frontier)$2/$12 (official frontier) | 均衡性能 / 日常对话 / 通用文本生成balanced perf / daily chat / general text gen | ||||||||||||||||||||||||||||||||||||||||||||||||||||||||||||||||||||||||||||||||||||||||||
gpt-5.6-luna |
OpenAIOpenAI | 256K256K | $0.20/$1.20 (官网 frontier)$0.20/$1.20 (official frontier) | 极速响应 / 低成本高频调用 / 大规模批处理lightning response / low-cost high-freq / large batch | ||||||||||||||||||||||||||||||||||||||||||||||||||||||||||||||||||||||||||||||||||||||||||
gpt-5.4 |
OpenAIOpenAI | 1.05M1.05M | $2.5/$15 (官网)$2.5/$15 (official) | 日常问答 / 通用文本生成 / 快速响应daily Q&A / general text gen / fast response | ||||||||||||||||||||||||||||||||||||||||||||||||||||||||||||||||||||||||||||||||||||||||||
gpt-5.4-mini |
OpenAIOpenAI | 400K400K | 官方同步价格official pricing | 性价比均衡 / 高并发 / 长文本处理balanced value / high concurrency / long text processing | ||||||||||||||||||||||||||||||||||||||||||||||||||||||||||||||||||||||||||||||||||||||||||
gpt-5.4-nano |
OpenAIOpenAI | 400K400K | 官方同步价格official pricing | 极低成本 / 大规模分类 / 数据清洗ultra-low-cost / large-scale classification / data cleaning
o3-miniOpenAIOpenAI |
200K200K |
官方同步价格official pricing |
数学推理 / 代码生成 / 逻辑问题解决math reasoning / code generation / logic problem solving |
gpt-image-1.5OpenAIOpenAI |
—— |
$5/$32 (text input + image output, 官网)$5/$32 (text input + image output, official) |
高精度图像生成 / 视觉设计 / 广告素材high-precision image gen / visual design / ad creatives |
text-embedding-3-largeOpenAIOpenAI |
8K8K |
官方同步价格official pricing |
语义搜索 / RAG知识库 / 文本向量化semantic search / RAG knowledge base / text vectorization |
claude-fable-5AnthropicAnthropic |
1M1M |
$10/$50 (官网)$10/$50 (official) |
深度推理 / 长任务 / 复杂分析deep reasoning / long-horizon / complex analysis |
claude-opus-4-8AnthropicAnthropic |
1M1M |
$5/$25 (官网, backendId 跟 opus-5 不对应)$5/$25 (official, backendId != opus-5) |
平衡性能与速度 / 通用任务处理balanced perf & speed / general task handling |
claude-sonnet-5AnthropicAnthropic |
1M1M |
$2/$10 (官网, 截至 2026-08-31, 9/1 起涨到 $3/$15)$2/$10 (official, valid until 2026-08-31, then $3/$15) |
日常首选 / 均衡性能与性价比daily driver / balanced perf & value |
claude-haiku-4-5AnthropicAnthropic |
200K200K |
$1/$5 (官网)$1/$5 (official) |
极速响应 / 低成本高频调用lightning response / low-cost high-freq |
MiniMax-M3MiniMaxMiniMax |
1M1M |
¥0.42/¥2.10 输入永久五折¥0.42/¥2.10 input 50% off |
超长上下文 / 全仓库分析ultra-long context / full repo analysis |
MiniMax-M2.7MiniMaxMiniMax |
1M1M |
¥2.10/¥8.40¥2.10/¥8.40 |
通用编程 / 长文档处理general coding / long doc processing |
deepseek-v4-proDeepSeekDeepSeek |
128K128K |
¥3/¥6 (高峰 ×2)¥3/¥6 (peak ×2) |
代码生成 / 中文注释 / 编程辅助code generation / Chinese comments / coding assistance |
deepseek-v4-flashDeepSeekDeepSeek |
128K128K |
¥0.5/¥2 (高峰 ×2)¥0.5/¥2 (peak ×2) |
高速响应 / 批量任务 / 轻量推理fast response / batch tasks / lightweight reasoning |
glm-4.7智谱Zhipu |
128K128K |
¥0.6/¥2.2¥0.6/¥2.2 |
数学推理 / 代码生成 / 逻辑问题math reasoning / code generation / logic problems |
glm-4.6v智谱Zhipu |
128K128K |
¥1/¥3¥1/¥3 |
图像理解 / 多模态识别 / 视觉问答image understanding / multimodal recognition / visual Q&A |
qwen3.7通义Tongyi |
128K128K |
max ¥12/¥36 / plus ¥2/¥12max ¥12/¥36 / plus ¥2/¥12 |
长上下文 / 复杂任务 / 综合能力long context / complex tasks / comprehensive ability |
ernie-5.1文心Wenxin |
128K128K |
¥4/¥18 (邀测占位)¥4/¥18 (beta placeholder) |
中文任务 / 通用对话 / 知识问答Chinese tasks / general chat / knowledge Q&A |
ernie-5.2文心Wenxin |
128K128K |
¥4/¥18 (未发布占位)¥4/¥18 (unreleased placeholder) |
多模态理解 / 视觉+文本混合任务multimodal understanding / vision+text hybrid tasks |
doubao-seed-2-1-pro-260628豆包Doubao |
128K128K |
¥6/¥30¥6/¥30 |
图像理解 / 多模态 / 视觉推理image understanding / multimodal / visual reasoning |
doubao-seed-2-1-turbo-260628豆包Doubao |
128K128K |
¥3/¥15¥3/¥15 |
高速响应 / 实时交互 / 性价比优先fast response / real-time interaction / value-first |
|
12.1 智能路由(auto:balanced / cheap / best)12.1 Smart Routing
不确定选哪个?用 auto: 前缀让万能API 自动挑选最合适的模型:Not sure? Use auto: prefix to let Universal API route automatically:
| 路由Route | 含义Meaning |
|---|---|
auto:cheap | 最便宜档,适合大批量 / 后台任务cheapest tier, for batch / background jobs |
auto:balanced | 性价比首选,80% 场景适用best value, fits 80% of cases |
auto:best | 最强模型,价格最高top model, highest price |
12.x 未上线模型档案(已从定价页下架)12.x Archived (unavailable) models
以下模型名称曾在定价页展示但平台当前未对接。如需使用请联系客服预约接入时间。model 字段传这些 ID 会返回 unsupported_model。The following model IDs were listed on the pricing page but are not yet wired in the platform. To use them please contact support. Sending these IDs in model returns unsupported_model.
| 模型 IDModel ID | 原厂商Vendor | 类别Category | 替代方案Use instead |
|---|---|---|---|
deepseek-v3 | DeepSeek | 代码 / 长文code | deepseek-v4-pro(已接入)deepseek-v4-pro (live) |
deepseek-r1 | DeepSeek | 推理reasoning | deepseek-v4-pro(已接入)deepseek-v4-pro (live) |
kimi-k2 | 月之暗面Moonshot | 长文long-doc | qwen3.7-plus 或 deepseek-v4-pro (256K 上下文)qwen3.7-plus or deepseek-v4-pro |
grok | xAI | 通用general | gpt-5.4(同等价位类似定位)gpt-5.4 (similar tier) |
gemini-2.5-pro | 长文多模态long-doc multimodal | 暂无替代 (Google provider 未配)no replacement (Google provider not wired) | |
gemini-2.5-flash | 低延迟多模态fast multimodal | gpt-4o-mini(视觉能力相近)gpt-4o-mini (similar vision) | |
claude-opus-4-7 | Anthropic | 推理旗舰reasoning flagship | claude-opus-4-8(已接入)claude-opus-4-8 (live) |
claude-opus-4-6 | Anthropic | 推理旗舰reasoning flagship | claude-opus-4-8(已接入)claude-opus-4-8 (live) |
claude-sonnet-4-6 | Anthropic | 代码多模态code multimodal | claude-sonnet-5(已接入)claude-sonnet-5 (live) |
llama-3.3-70b | Meta | 开源open-source | qwen3.7-plus(开源兼容)qwen3.7-plus |
mistral-large | Mistral AI | 多语言multilingual | qwen3.7-plus(多语言强)qwen3.7-plus |
dall-e-3 | OpenAI | 文生图image | gpt-image-1.5(新代文生图)gpt-image-1.5 |
sora | OpenAI | 视频video | 暂无替代no replacement yet |
whisper | OpenAI | 语音识别ASR | 暂无替代no replacement yet |
tts-1 | OpenAI | 语音合成TTS | MiniMax-speech 已下线,请用 Gemini 多模态语音use Gemini multimodal voice |
minimax-speech | MiniMax | 语音合成TTS | 暂无替代no replacement yet |
text-embedding-3 | OpenAI | 向量(小尺寸)embedding-small | text-embedding-3-large(已接入)text-embedding-3-large (live) |
bge-m3 | 智源 BAAIBAAI | 开源向量open embedding | text-embedding-3-large(已接入)text-embedding-3-large (live) |
seedream | 字节即梦Volc Jimeng | 文生图image | 暂无替代no replacement yet |
flux-1 | Black Forest | 文生图image | gpt-image-1.5(已接入)gpt-image-1.5 |
sd-3.5 | Stability | 文生图image | gpt-image-1.5 |
kling-v3 | 快手可灵Kuaishou Kling | 视频video | 暂无替代no replacement yet |
seedance | 字节即梦Volc Jimeng | 视频video | 暂无替代no replacement yet |
13. 错误码13. Error Codes
| HTTP | Code | 含义Meaning | 怎么处理How to handle |
|---|---|---|---|
| 400 | invalid_body | 请求体不是合法 JSONRequest body is not valid JSON | 检查 JSON 语法check JSON syntax |
| 400 | missing_model | 请求体缺少 model 字段Missing model field | 补 modeladd model field |
| 400 | unsupported_model | 模型 ID 不在支持列表Model ID not in support list | 查 第 12 节see section 12 |
| 400 | invalid_input | input 必须是 string 或 arrayinput must be string or array | 改 input 格式fix input shape |
| 401 | missing_api_key | 缺少 Authorization: Bearer 头Missing Authorization: Bearer header | 加 headeradd header |
| 401 | invalid_api_key_format | Key 必须以 sk- 开头且长度 ≥ 20 字符Key must start with sk- and be ≥ 20 chars | 检查 Key 格式check key format |
| 401 | invalid_api_key | Key 无效 / 未同步账本 / 已吊销Key invalid / not synced to ledger / revoked | 重新生成 Keyregenerate |
| 402 | quota_exceeded | 余额不足Insufficient balance | 充值top up |
| 403 | key_disabled | Key 状态非 active (被管理员停用)Key status not active (disabled by admin) | 联系管理员contact admin |
| 403 | key_expired | API Key 已过期API Key expired | 续费 / 重生 Keyrenew / regenerate |
| 429 | rate_limited | 触发限流 (requests/min 上限)Rate limit exceeded (requests/min) | 指数退避重试exp backoff retry |
| 502 | upstream_error | 上游厂商故障 (HTTP 透传, 通常 4xx/5xx)Upstream provider error (HTTP passthrough, usually 4xx/5xx) | 换模型 / 重试switch model / retry |
| 503 | provider_not_configured | 厂商 API Key 未配置Provider API Key not configured | 等待平台补全 / 换模型wait for platform / switch model |
| 503 | billing_unavailable | 计费服务暂不可用Billing service unavailable | 稍后重试retry later |
13.1 指数退避 + jitter 重试13.1 Exp backoff + jitter retry
import time, random
def call_with_retry(payload, max_retries=5):
    delay = 1
    for i in range(max_retries):
        try:
            return client.chat.completions.create(**payload)
        except Exception as e:
            if i == max_retries - 1: raise
            if "429" in str(e) or "500" in str(e):
                time.sleep(delay + random.uniform(0, 0.5))
                delay *= 2
14. FAQ
中文 ≈ 1.5 字符 / Token,英文 ≈ 0.75 词 / Token。可在控制台 → 实时 Token 计算器 输入文本预估。Chinese ≈ 1.5 characters/token, English ≈ 0.75 words/token. Use the live Token calculator in the dashboard to estimate.
详见 第 12 节已接入模型。不确定就用 auto:balanced。See section 12 Available Models. When in doubt, use auto:balanced.
TLS 1.3 全程加密,不存对话内容,仅记调用日志用于计费和异常排查,30 天自动删除。All traffic TLS 1.3 encrypted. We don't store conversation content — only call logs for billing and debugging, auto-deleted after 30 days.
编码首选 Claude Code(终端党)或 Codex(多 provider 切换)。工作流首选 n8n / Dify。本地图像 + 云端 prompt 首选 ComfyUI + 万能API。For coding: Claude Code (terminal) or Codex (multi-provider). For workflows: n8n / Dify. For image + cloud prompt: ComfyUI + Universal API.
不会。同一个 Key 可同时用于 Claude Code + Codex + n8n 等独立实例,配额共享在账号维度而非 Key 维度。No. One Key works across Claude Code + Codex + n8n etc. concurrently. Quota is shared at the account level, not per Key.
TRIAL 套餐注册即送 100 万 Token,永久免费。TRIAL plan includes 1M free tokens forever on sign-up.
未使用 Token 余额可在购买后 30 天内申请退款,已使用部分不退。Unused Token balance can be refunded within 30 days of purchase; used portions are non-refundable.
联系 luodashao_vip@126.com,提供专属客户经理、私有化部署、定制 SLA。Contact luodashao_vip@126.com for dedicated account manager, on-prem deployment, custom SLA.
邮箱 luodashao_vip@126.com,工作日 24h 内回复。Email luodashao_vip@126.com, replied within 24h on business days.
16.1 Claude Desktop 桌面端16.1 Claude Desktop DesktopAnthropic 官方桌面端
Claude Desktop 是 Anthropic 官方的独立桌面 app(与 Claude Code CLI / Codex 等 CLI 工具独立)。其内置的 Developer Mode 支持自定义 Anthropic 兼容的 Gateway,对接万能API 协议即可开箱使用全部 21 个模型,无需 CC Switch。 Claude Desktop is Anthropic's official standalone desktop app (independent of Claude Code CLI / Codex and other CLI tools). Its built-in Developer Mode accepts a custom Anthropic-compatible Gateway; pointing it at the Universal API protocol unlocks all 21 models out of the box—no CC Switch required.
16.1.1 准备工作16.1.1 Preparations
- 万能 API KeyUniversal API Key:在 wannapi.com 控制台获取: obtain from the wannapi.com console
- Claude Desktop 桌面端Claude Desktop:下载最新版 claude.com/download: download the latest from claude.com/download
- 网关地址Gateway URL:
https://api.wannapi.com(不带/v1):https://api.wannapi.com(no/v1)
16.1.2 退出登录16.1.2 Sign out
打开 Claude Desktop,必须处于未登录状态(停在登录页面),否则看不到配置入口。Open Claude Desktop and make sure you are signed out (stuck on the sign-in page); otherwise the configuration entry won't appear.
16.1.3 启用开发者模式16.1.3 Enable Developer Mode
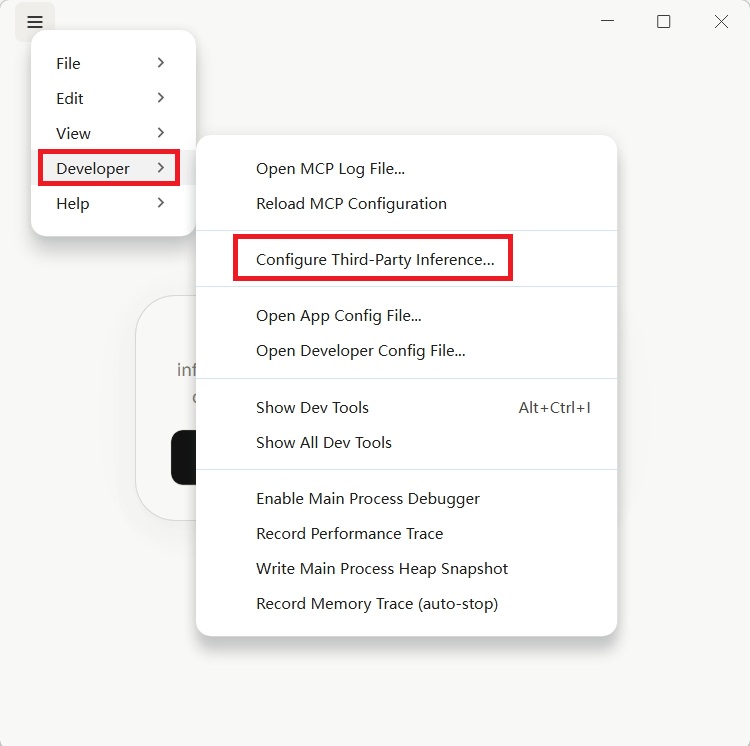
顶部菜单栏 → Help → Troubleshooting → Enable Developer Mode。macOS 与 Windows 路径相同。Top menu bar → Help → Troubleshooting → Enable Developer Mode. The path is identical on macOS and Windows.
启用后,菜单栏会出现 Developer 选项。Once enabled, a Developer menu item appears in the menu bar.
16.1.4 配置第三方推理16.1.4 Configure Third-Party Inference
点击 Developer → Configure Third-Party Inference,按字段填写:Click Developer → Configure Third-Party Inference and fill in the fields:
Connection:               Gateway
Gateway Base URL:         https://api.wannapi.com
Gateway API Key:          你的万能API Keyyour Universal API key
Gateway Authentication:   x-api-key
Gateway Model:            claude-free  🟢 免费通道(可改为其他支持的模型)🟢 free channel (change to other supported models)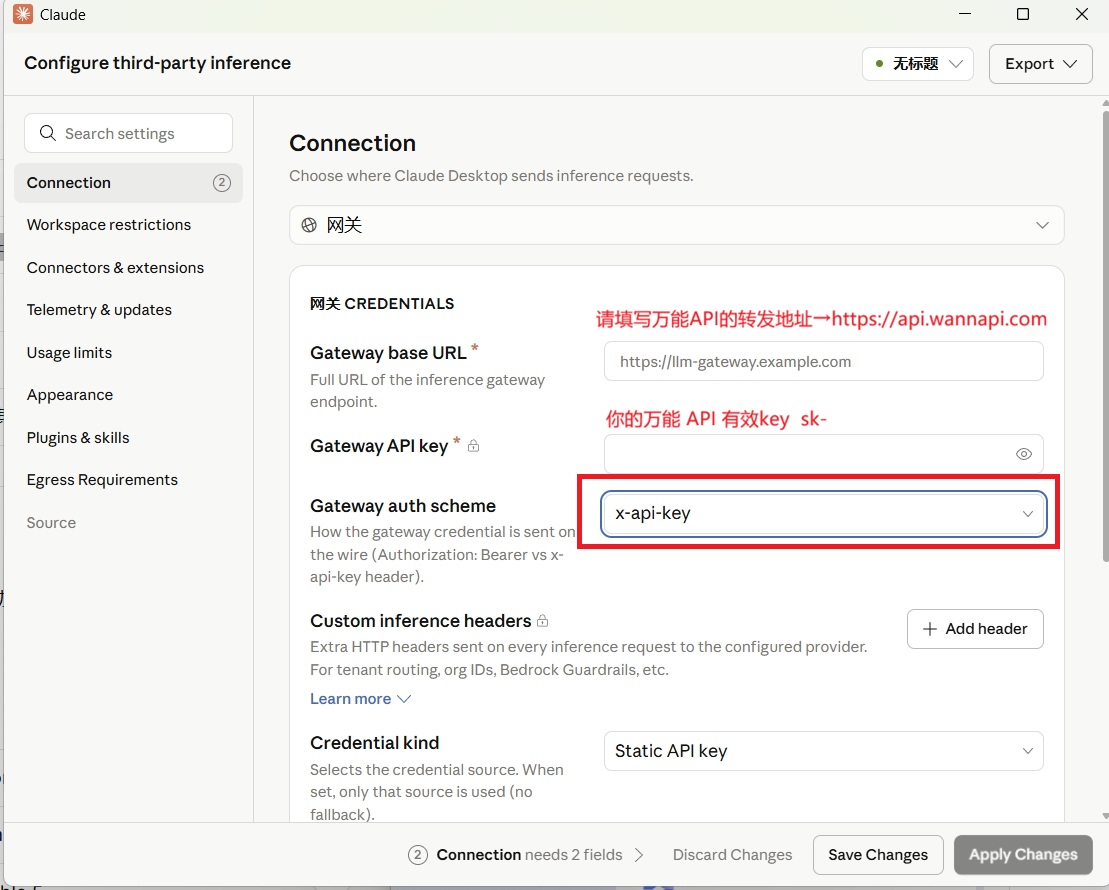
16.1.5 模型列表(可选)16.1.5 Model list (optional)
如果 /v1/models 端点已配置(已支持),Claude Desktop 会自动发现 21 个模型。If the /v1/models endpoint is configured (already supported), Claude Desktop auto-discovers 21 models.
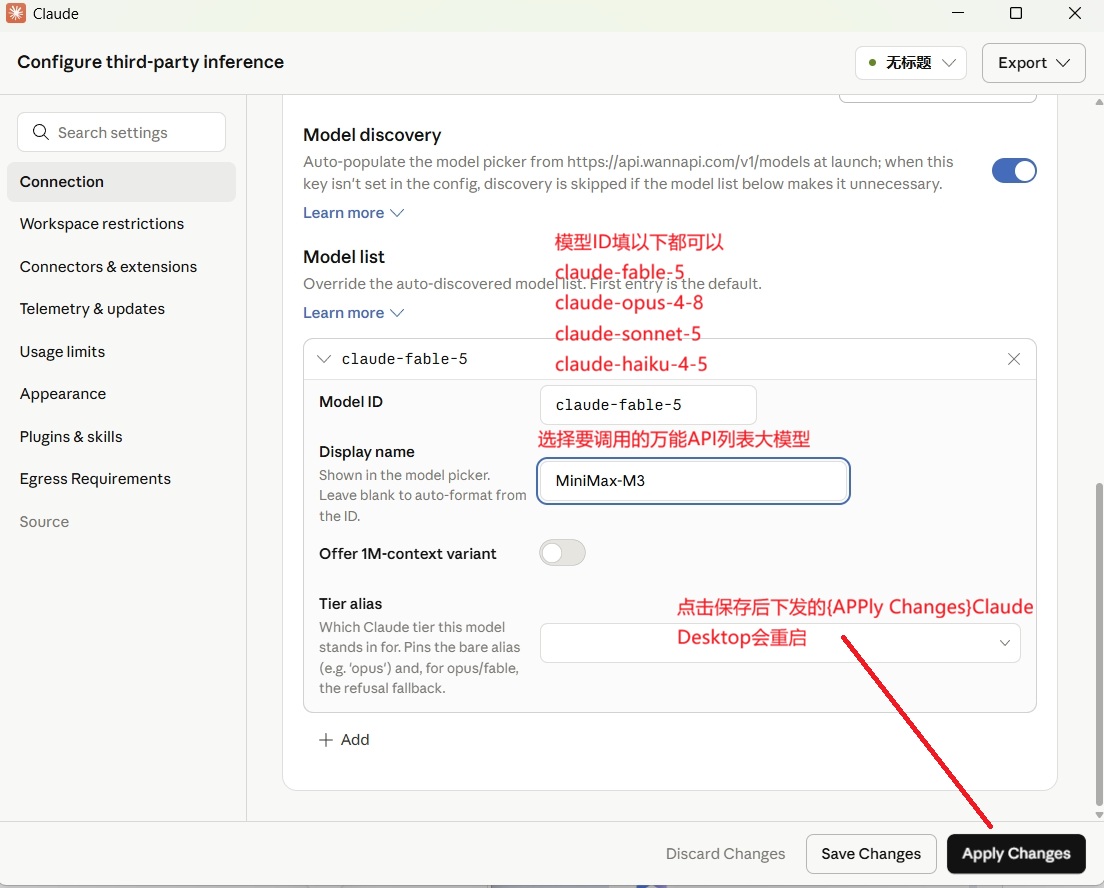
需手动添加模型列表,在配置界面点 Add Item:To add models manually, click Add Item in the configuration screen:
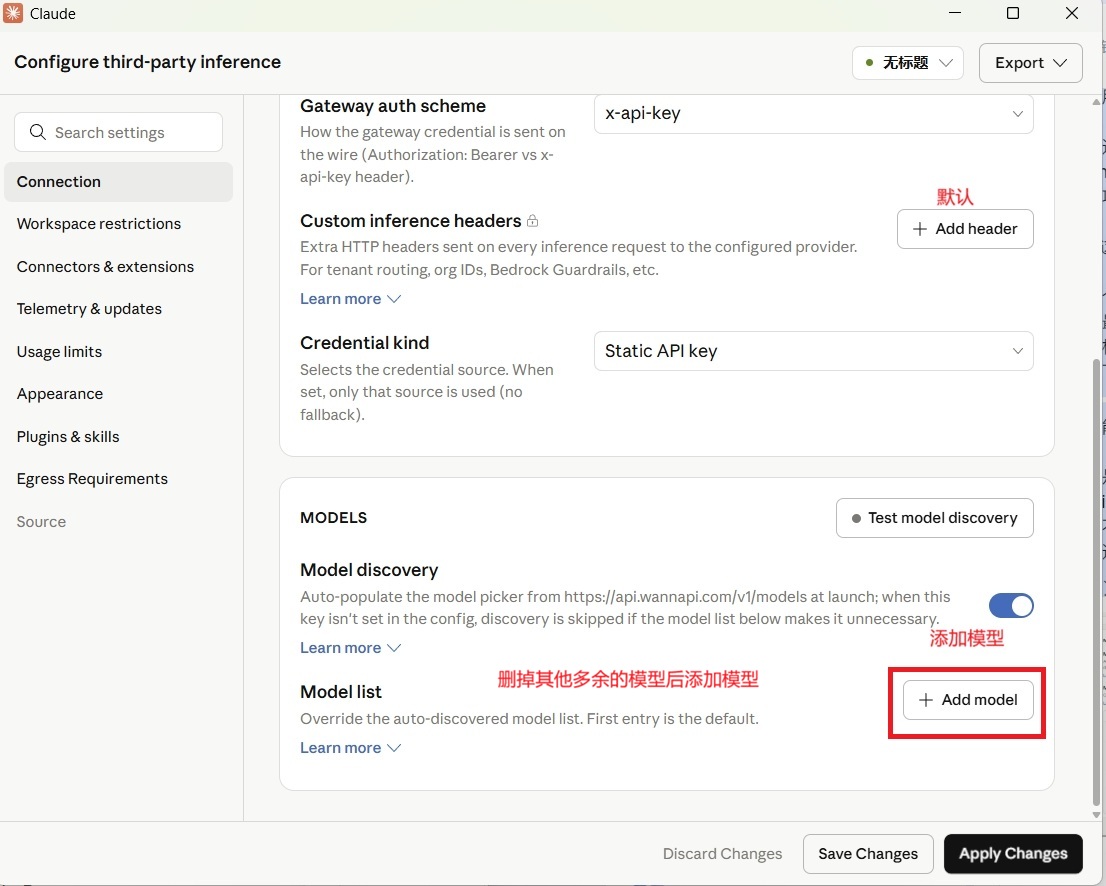
| 模型 IDModel ID | 显示名称Display name |
|---|---|
claude-sonnet-5 | Claude Sonnet 5Claude Sonnet 5 |
claude-haiku-4-5 | Claude Haiku 4.5Claude Haiku 4.5 |
claude-fable-5 | Claude Fable 5Claude Fable 5 |
claude-opus-4-8 | Claude Opus 4.8Claude Opus 4.8 |
MiniMax-M3 | MiniMax M3MiniMax M3 |
16.1.6 保存16.1.6 Save
点击 Apply locally,Claude Desktop 自动重启。Click Apply locally; Claude Desktop restarts automatically.
16.1.7 验证16.1.7 Verify
发一条消息测试。如果正常回复,说明配置成功 ✅Send a test message. A normal reply means configuration succeeded ✅
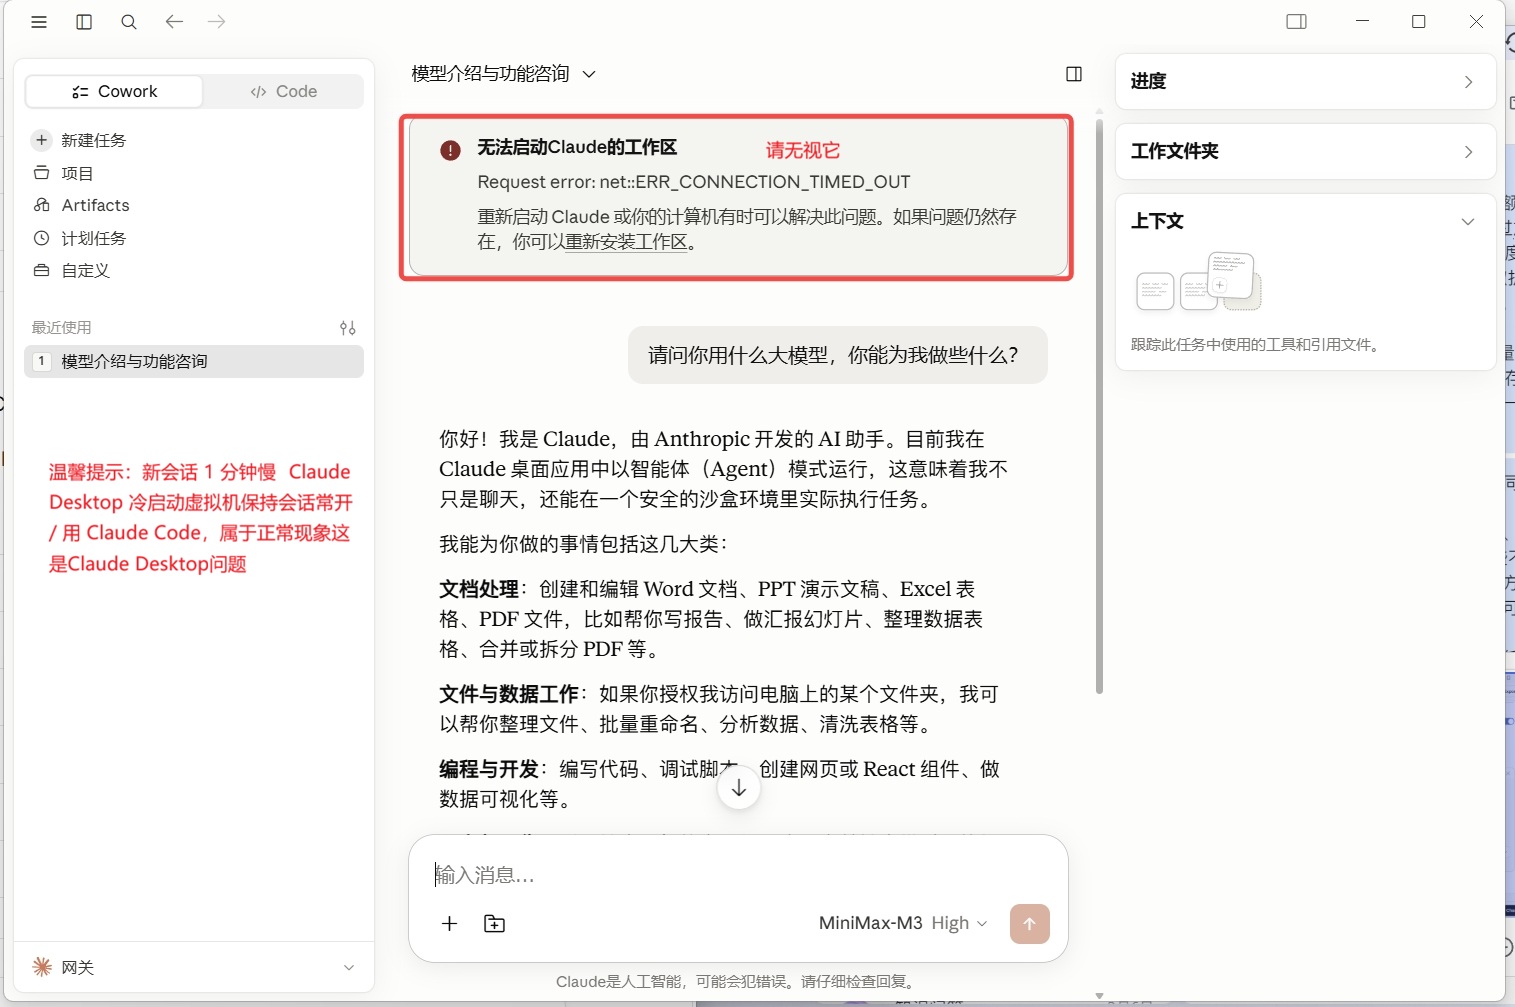
javaht/claude-desktop-zh-cn)。
See the Claude Desktop Chinese localization tutorial (open-source javaht/claude-desktop-zh-cn).
16.1.8 支持的模型列表(21 个)16.1.8 Supported Models (21)
| 厂商Vendor | 模型Model |
|---|---|
| Agnes | agnes-2.0-flash 🟢 免费Free |
| 万能API(免费通道)Universal API (free channel) | claude-free 🟢 完全免费,实际调用 agnes-2.0-flash(也支持 codex-free / opencode-free / gemini-free / openai-free,均免费)completely free, actually calls agnes-2.0-flash (also accepts codex-free / opencode-free / gemini-free / openai-free, all free) |
| OpenAI | gpt-5.5, gpt-5.4, gpt-5.4-mini, gpt-5.4-nano |
| Anthropic | claude-fable-5, claude-opus-4-8, claude-sonnet-5, claude-haiku-4-5 |
| MiniMax | MiniMax-M3, MiniMax-M2.7 |
| DeepSeek | deepseek-v4-pro, deepseek-v4-flash |
| 智谱Zhipu | glm-4.7, glm-4.6v |
| 通义Tongyi | qwen3.7-max, qwen3.7-plus |
| 文心Wenxin | ernie-5.1, ernie-5.2 |
| 豆包Doubao | doubao-seed-2-1-pro-260628, doubao-seed-2-1-turbo-260628 |
16.1.9 常见问题16.1.9 FAQ
| 问题Problem | 原因Cause | 解决Solution |
|---|---|---|
ERR_CONNECTION_TIMED_OUT |
网关连不上Gateway unreachable | 检查 Worker 是否部署 / 重启 Claude DesktopCheck whether the Worker is deployed / restart Claude Desktop |
missing x-api-key header |
认证方式不对Wrong auth method | 改成 x-api-keySwitch to x-api-key |
unsupported message role: system |
模型不支持 system 角色Model doesn't support the system role |
✅ 已自动转换 userAuto-converted to user |
| 新会话 1 分钟慢New chat is slow (1 min) | Claude Desktop 冷启动虚拟机Claude Desktop cold-starts a VM | 保持会话常开 / 用 Claude CodeKeep the chat open / use Claude Code |
claude-free,实际调用的是免费的 agnes-2.0-flash 模型(512M 上下文、零 token、零费用),不消耗万能API 余额。如需更高质量,按需切到 claude-sonnet-5 等付费模型。
Set claude-free in the Gateway Model field — it actually runs the free agnes-2.0-flash model (512M context, zero tokens, zero cost) without touching your Universal API balance. For higher quality, switch to claude-sonnet-5 or other paid models as needed.
16.1.10 架构总览16.1.10 Architecture Overview
Claude Desktop
     │
     ▼ (x-api-key 认证 / x-api-key auth)
https://api.wannapi.com/v1/messages
     │
     ▼ (system → user 转换 / system→user conversion)
Cloudflare Worker (ai-gateway-worker)
     │
     ▼ (转发 / forward)
万能 API 网关Universal API Gateway
     │
     ▼
目标模型 (Anthropic / OpenAI / MiniMax 等)Target model (Anthropic / OpenAI / MiniMax etc.)
16.2 Codex 桌面端16.2 Codex DesktopOpenAI 官方 GUI
Codex 桌面端是 OpenAI 官方的 ChatGPT 桌面 app 内嵌的编码模块(与 CLI 形态 4 章并存,桌面端适合非终端用户)。与 16.1 Claude 桌面端不同,Codex 桌面端没有 Developer Mode,必须借助 CC Switch 统一管理万能API Key,并使用 Codex 专属的 Responses API 协议。 Codex Desktop is OpenAI's official coding module embedded in the ChatGPT desktop app (coexists with the CLI variant in section 4; desktop is ideal for non-terminal users). Unlike the Claude Desktop in 16.1, Codex Desktop has no Developer Mode—the Universal API Key must be managed through CC Switch using Codex's Responses API protocol.
16.2.1 准备工作16.2.1 Preparations
| 项目Item | 说明Description | 状态Status |
|---|---|---|
| 万能API 账号Universal API account | 访问 https://www.wannapi.com 注册register at https://www.wannapi.com | [ ] |
| API Key | 格式:sk- 开头format: starts with sk- |
[ ] |
| Codex 桌面端Codex Desktop | OpenAI ChatGPT 桌面 AppOpenAI ChatGPT desktop app | [ ] |
| CC Switch | 开源配置管理工具open-source config manager | [ ] |
| 网络Network | 可访问 https://api.wannapi.comreaches https://api.wannapi.com |
[ ] |
16.2.2 安装 Codex 桌面端(Windows + macOS)16.2.2 Install Codex Desktop (Windows + macOS)
🪟 Windows 用户🪟 Windows users
方式一:Microsoft Store(推荐)Method 1: Microsoft Store (recommended)
- 打开 Microsoft StoreOpen Microsoft Store
- 搜索 "Codex"Search "Codex"
- 或直接访问:apps.microsoft.com/detail/9plm9xgg6vksor visit directly: apps.microsoft.com/detail/9plm9xgg6vks
- 点击 获取 / 安装click Get / Install
- 等待下载完成,自动安装wait for download to complete; auto-installs
方式二:官网下载Method 2: Official download
- 访问 chatgpt.com/downloadVisit chatgpt.com/download
- 下载 Windows 版本安装包(.exe)download the Windows installer (.exe)
- 双击运行,按提示完成安装double-click and follow the prompts
🍎 macOS 用户🍎 macOS users
- 访问 chatgpt.com/downloadVisit chatgpt.com/download
- 点击下载 macOS 版本(.dmg 文件)click to download the macOS version (.dmg)
- 双击打开 .dmg 文件double-click the .dmg to open
- 将 ChatGPT.app 拖入 Applications 文件夹drag ChatGPT.app into the Applications folder
- 首次打开如提示"无法验证开发者":打开 系统设置 → 隐私与安全性,找到被拦截的 App,点击 "仍要打开"if prompted "cannot verify developer": open System Settings → Privacy & Security, find the blocked app, click "Open Anyway"
16.2.3 创建万能API Key16.2.3 Create a Universal API Key
操作步骤(通用)Steps (universal)
- 登录 https://www.wannapi.comLog in to https://www.wannapi.com
- 进入 控制台go to Console
- 左侧菜单 → API Keys → 新建left menu → API Keys → New
- ⚠️ 立即复制 Key 并保存到安全位置(关闭后无法再次查看)⚠️ copy the key immediately and store it safely (it can't be shown again after closing)
16.2.4 安装 CC Switch(Windows + macOS)16.2.4 Install CC Switch (Windows + macOS)
CC Switch 是开源桌面应用(Rust + Tauri 开发,约 6MB),用于一键切换 provider。CC Switch is an open-source desktop app (Rust + Tauri, ~6 MB) for one-click provider switching.
🪟 Windows 用户🪟 Windows users
- 访问 GitHub Releases:github.com/farion1231/cc-switch/releasesVisit GitHub Releases: github.com/farion1231/cc-switch/releases
- 下载
cc-switch_版本号_x64-setup.exedownloadcc-switch_VERSION_x64-setup.exe - 双击运行安装程序double-click to run the installer
- 按提示完成安装(如提示"Windows 已保护你的电脑",点击 "仍要运行")follow the prompts; if prompted "Windows protected your PC", click "Run anyway"
- 安装完成后,从开始菜单或桌面快捷方式启动after install, launch from the Start menu or desktop shortcut
🍎 macOS 用户🍎 macOS users
- 访问 GitHub Releases:github.com/farion1231/cc-switch/releasesVisit GitHub Releases: github.com/farion1231/cc-switch/releases
- 下载对应版本:download the right build:
- Intel 芯片 →
cc-switch_版本号_x64.dmgIntel chip →cc-switch_VERSION_x64.dmg - Apple Silicon (M1/M2/M3) →
cc-switch_版本号_aarch64.dmgApple Silicon (M1/M2/M3) →cc-switch_VERSION_aarch64.dmg
- 双击打开 .dmg 文件double-click the .dmg to open
- 将 CC Switch.app 拖入 Applications 文件夹drag CC Switch.app into the Applications folder
- 首次打开如提示"无法验证开发者":打开 系统设置 → 隐私与安全性,点击 "仍要打开"if prompted "cannot verify developer": open System Settings → Privacy & Security, click "Open Anyway"
16.2.5 在 CC Switch 中添加 Codex 配置16.2.5 Add Codex config in CC Switch
16.2.5.1 添加 Provider16.2.5.1 Add a Provider
- 打开 CC Switch 应用Open the CC Switch app
- 左侧栏点击 Codex 图标(终端标志)click the Codex icon in the left sidebar (terminal-style)
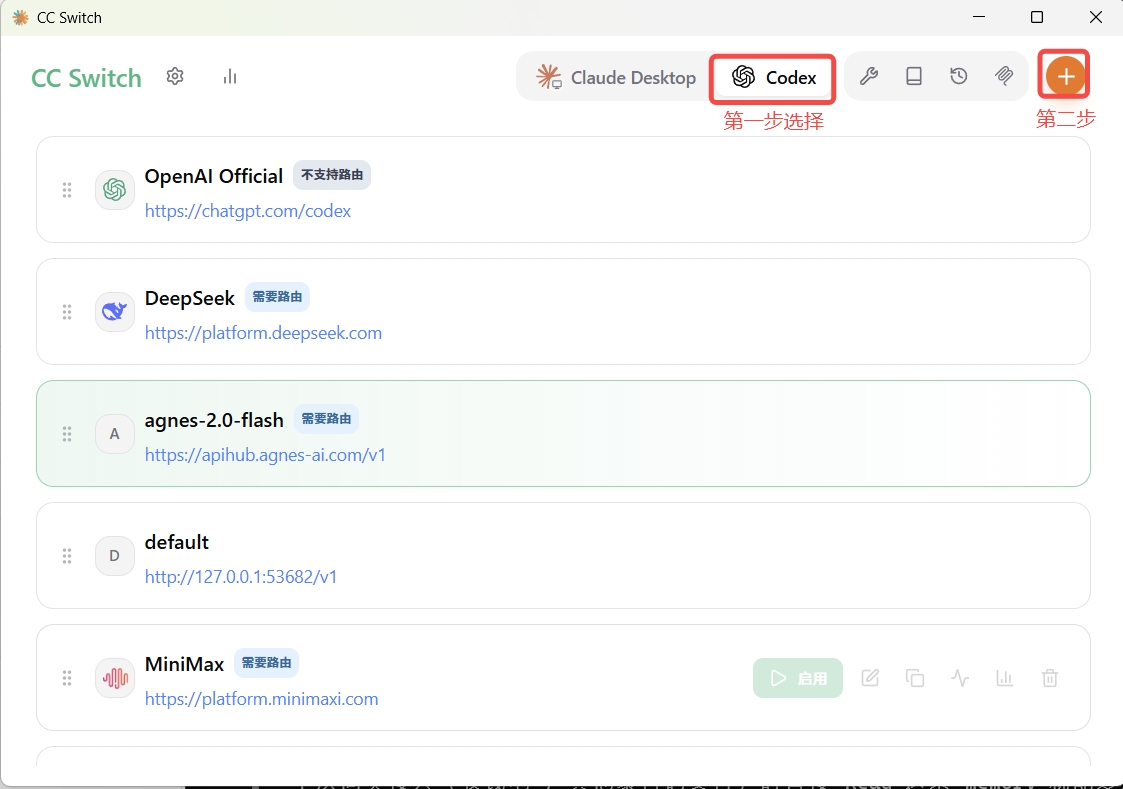
- 右上角点击
+ Add Provider(或+按钮)click+ Add Provider(or the+button) in the top-right
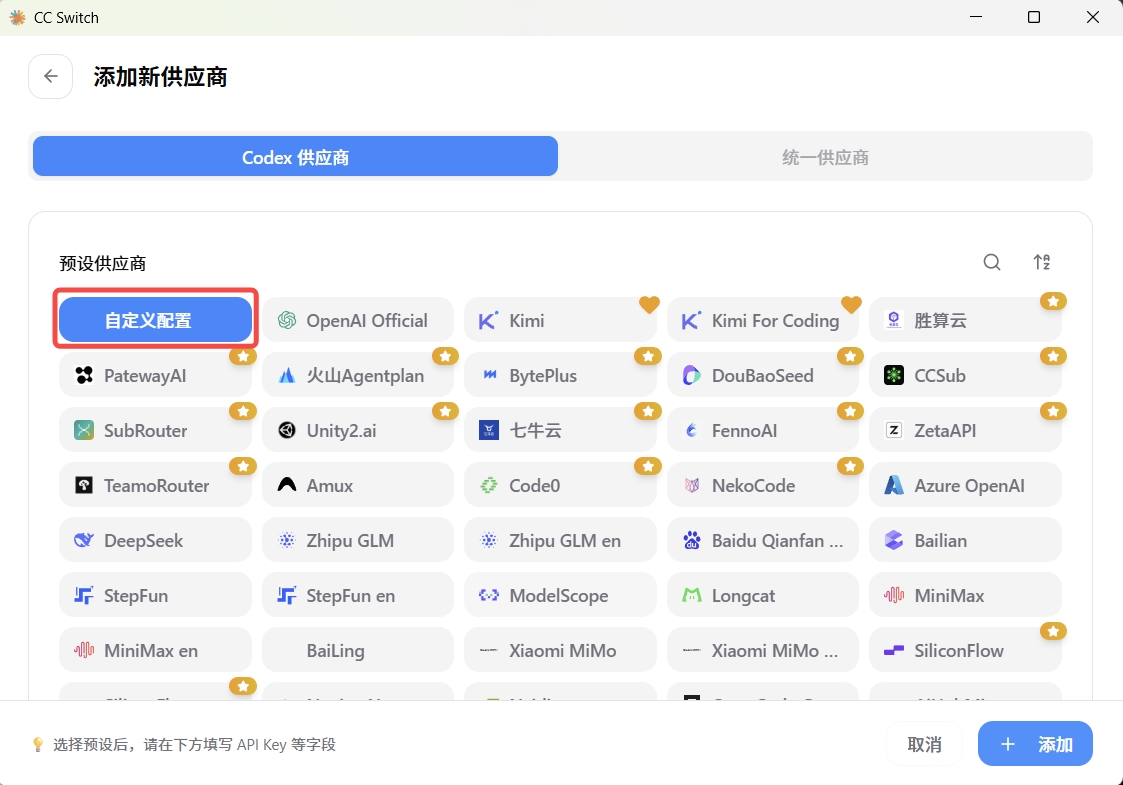
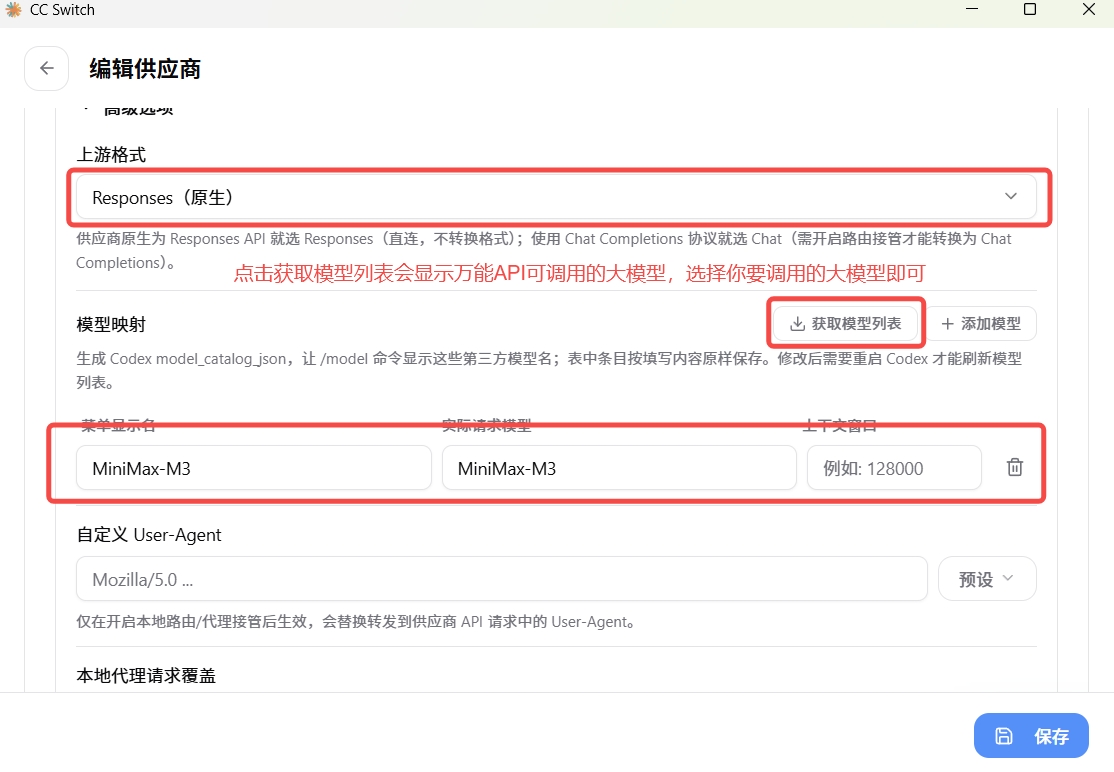
- 弹出配置窗口,填写以下字段:the config dialog opens; fill the following fields:
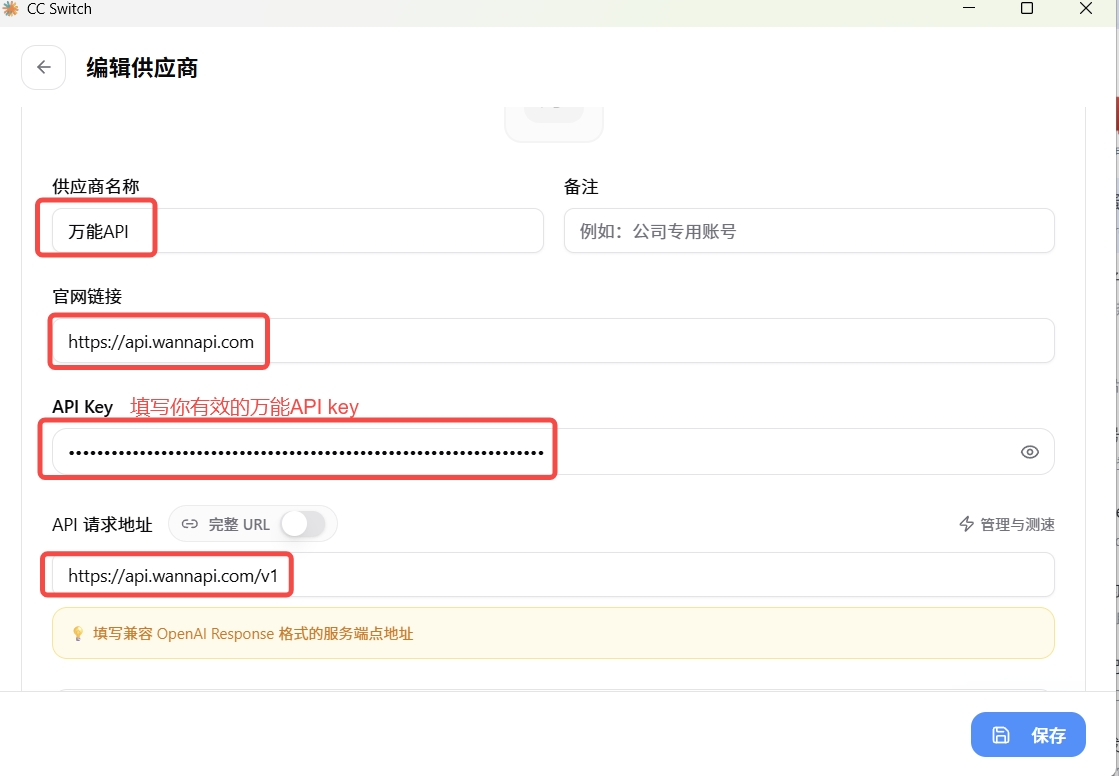
| 字段Field | 值Value | ⚠️ 说明⚠️ Notes |
|---|---|---|
| 名称 / NameName | My Wannapi Codex | 可自定义customizable |
| Base URL | https://api.wannapi.com/v1 | 必须带 /v1must include /v1 |
| 万能API KeyUniversal API Key | sk-... | 粘贴步骤 16.2.3 复制的 Keypaste the key from step 16.2.3 |
| Wire API | responses | 必须填 responsesrequired responses |
| Model | MiniMax-M3 | 确保在令牌分组中存在must exist in your token group |
- 点击 添加 / Import 保存配置click Add / Import to save the config
16.2.6 启用并验证16.2.6 Enable and verify
16.2.6.1 启用配置16.2.6.1 Enable the config
- 在 CC Switch 供应商列表中,找到
My Wannapi Codexin CC Switch's provider list, findMy Wannapi Codex
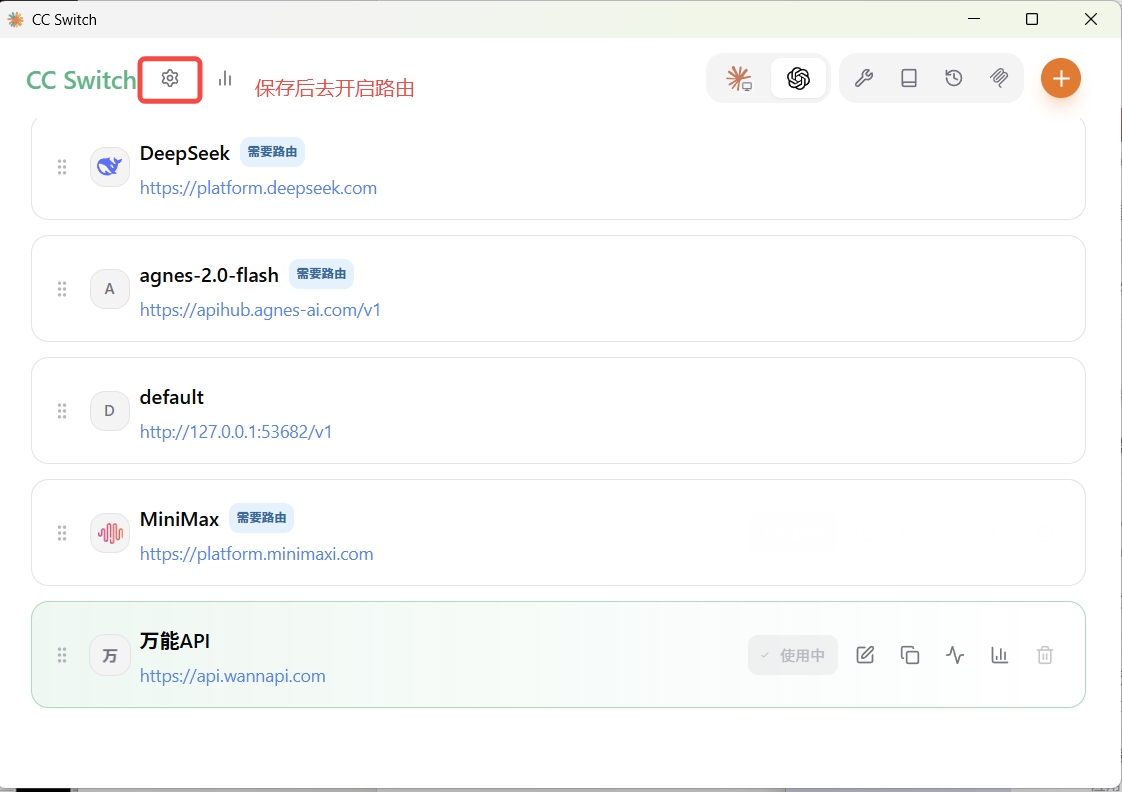
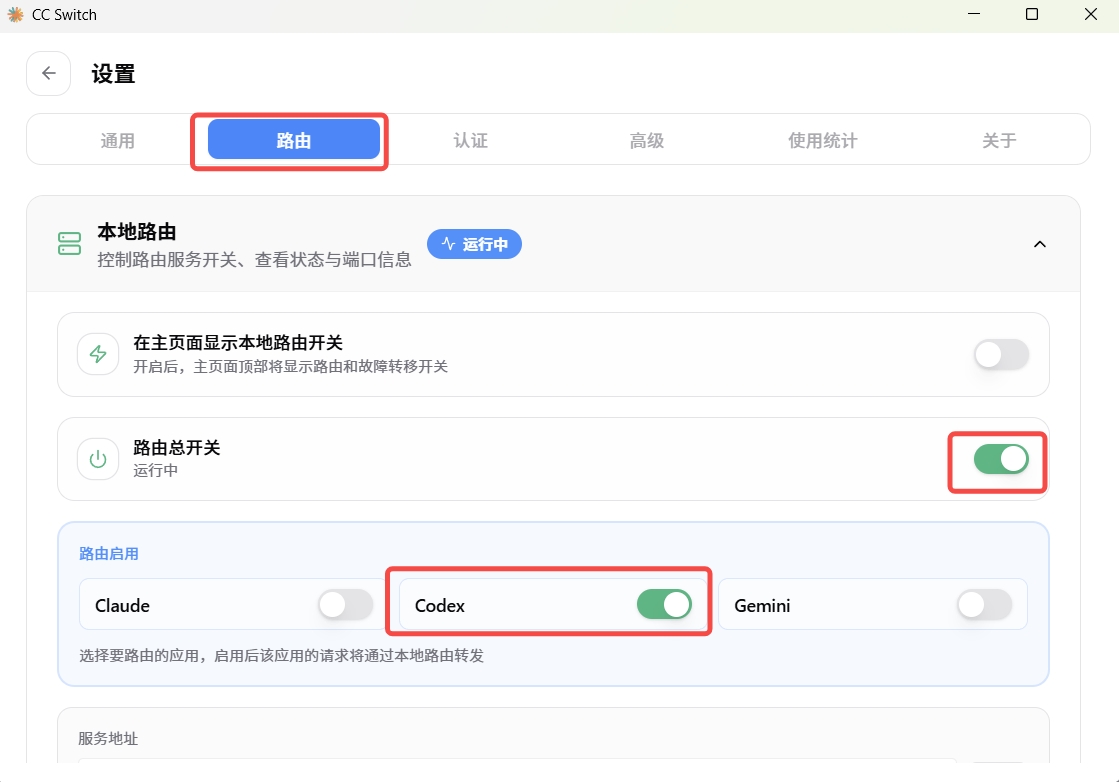
- 点击 启用(Enable) 按钮click the Enable button
- 确认状态变为"已启用" / "Active"confirm the status changes to "Active" / "已启用"
16.2.6.2 连通性测试16.2.6.2 Connectivity test
- 点击 连通性测试(Connectivity Test)click Connectivity Test
- 看到 "连通正常" / "Connected" → ✅ 配置正确see "Connected" → ✅ config is correct
- ❌ 如果测试失败,请参考 16.2.9 常见问题排查❌ if the test fails, see 16.2.9 FAQ
16.2.6.3 在 Codex 桌面端验证16.2.6.3 Verify inside Codex Desktop
- 打开 Codex 桌面端(ChatGPT 桌面 App)open Codex Desktop (ChatGPT desktop app)
- 新建对话(New Chat)start a New Chat
- 发送测试消息:send a test message:
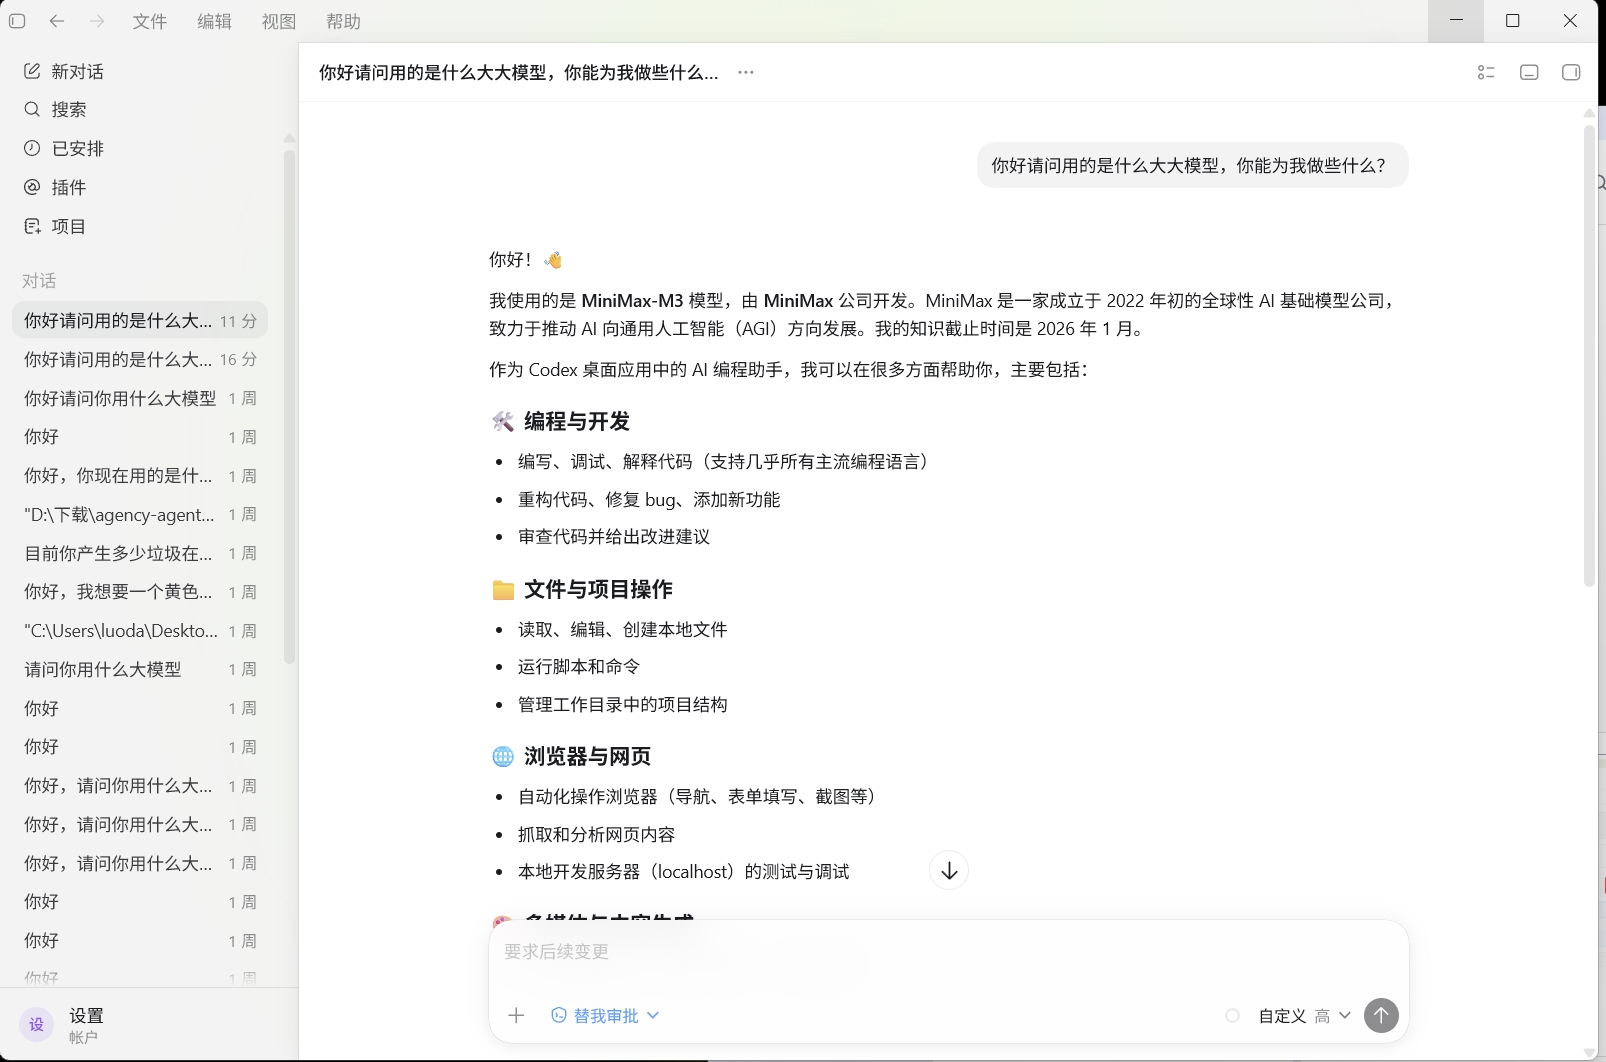
你好,请用中文简单介绍一下你自己Hi, please briefly introduce yourself in English.- 收到模型回复 → ✅ 配置成功!receive a model reply → ✅ configuration succeeded!
16.2.7 切换模型16.2.7 Switch models
16.2.7.1 常用模型推荐16.2.7.1 Recommended models
| 模型 IDModel ID | 厂商Vendor | 上下文Context | 最佳场景Best for |
|---|---|---|---|
codex-free 🟢 | 万能API(免费通道)Universal API (free) | 512M | 免费试水(实际调 agnes-2.0-flash,零费用)free trial (calls agnes-2.0-flash at zero cost) |
MiniMax-M3 | MiniMax | 1M | 超长文档分析、全仓库代码审查(输入五折)very long docs, full-repo review (input 50% off) |
gpt-5.5 | OpenAI | 128K | 代码重构、多文件协同编辑code refactor, multi-file edit |
claude-fable-5 | Anthropic | 200K | 深度推理、复杂问题分析deep reasoning, complex analysis |
deepseek-v4-pro | DeepSeek | 128K | 代码生成、中文注释code generation, Chinese comments |
gpt-5.4-mini | OpenAI | 400K | 性价比均衡、高并发场景best price/perf, high concurrency |
16.2.7.2 切换方式16.2.7.2 How to switch
- 在 Codex 桌面端内:直接在模型下拉列表中选择inside Codex Desktop: pick from the model dropdown
- 通过 CC Switch:打开 CC Switch → Codex 配置 → 修改 Model 字段 → 点击保存via CC Switch: open CC Switch → Codex config → edit the Model field → Save
16.2.8 Windows 与 macOS 差异对照16.2.8 Windows vs macOS differences
| 项目Item | Windows | macOS |
|---|---|---|
| Codex 安装Codex install | Microsoft Store 或官网 .exeMicrosoft Store or .exe | 官网下载 .dmg,拖入 Applications.dmg, drag into Applications |
| CC Switch 下载CC Switch download | .exe 安装包.exe installer | .dmg(Intel)或 .dmg(Apple Silicon).dmg (Intel) or .dmg (Apple Silicon) |
| 安全提示Security prompt | "Windows 已保护你的电脑" → 点击"仍要运行""Windows protected your PC" → "Run anyway" | "无法验证开发者" → 系统设置 → 隐私与安全性 → "仍要打开""cannot verify developer" → System Settings → Privacy & Security → "Open Anyway" |
| 快捷键Shortcuts | Win + 搜索应用Win + search apps | Cmd + 空格搜索应用Cmd + Space to search apps |
| 启动路径Launch paths | 开始菜单 / 桌面快捷方式Start menu / desktop shortcut | Applications 文件夹 / LaunchpadApplications folder / Launchpad |
| 系统要求System reqs | Windows 10 / 11 及以上Windows 10 / 11 or later | macOS 10.15 (Catalina) 及以上macOS 10.15 (Catalina) or later |
| Apple Silicon | 不适用N/A | M1/M2/M3 芯片需下载 aarch64 版本M1/M2/M3 chips need aarch64 build |
16.2.9 常见问题排查16.2.9 FAQ
16.2.9.1 连通性测试失败16.2.9.1 Connectivity test fails
逐项排查清单:Checklist (verify each item):
| 检查项Check | 操作Action |
|---|---|
| key 是否已启用is the key enabled | 登录万能API 控制台检查 API Key 状态log into the Universal API console and check the API Key status |
| 令牌分组是否含所选模型does the group contain the model | 确认分组中包含你在 CC Switch 填写的 Modelconfirm the Model you set in CC Switch is in the group |
| Base URL 是否正确is Base URL correct | 必须是 https://api.wannapi.com/v1(带 /v1)must be https://api.wannapi.com/v1 (with /v1) |
| API Key 格式正确is the API Key format correct | sk- + 64 位 hex,共 67 字符,无多余空格64-char hex, 67 chars total, no extra whitespace |
| 网络是否可达is the network reachable | 终端 / CMD 运行 ping api.wannapi.comterminal/CMD: ping api.wannapi.com |
16.2.9.2 Codex 桌面端无响应16.2.9.2 Codex Desktop is unresponsive
| 问题Issue | Windows 解决方案Windows fix | macOS 解决方案macOS fix |
|---|---|---|
| CC Switch 未启用当前配置CC Switch config not enabled | 确认供应商已点击"启用"confirm the provider is "Enabled" | 同左same as left |
| CC Switch 未运行CC Switch not running | 检查系统托盘是否有 CC Switch 图标check the system tray for the CC Switch icon | 检查菜单栏是否有 CC Switch 图标check the menu bar for the CC Switch icon |
| 需要重启needs a restart | 关闭 Codex 桌面端重新打开close and reopen Codex Desktop | 关闭 Codex 桌面端重新打开(Cmd + Q 完全退出)close and reopen Codex Desktop (Cmd + Q to fully quit) |
16.2.9.3 Windows 特有报错16.2.9.3 Windows-specific errors
| 报错Error | 解决方案Fix |
|---|---|
| "Windows 已保护你的电脑""Windows protected your PC" | 点击 "仍要运行"click "Run anyway" |
| 安装后找不到应用app not found after install | 检查开始菜单,或重新安装check the Start menu, or reinstall |
| CC Switch 闪退CC Switch crashes on launch | 尝试以管理员身份运行try running as administrator |
16.2.9.4 macOS 特有报错16.2.9.4 macOS-specific errors
| 报错Error | 解决方案Fix |
|---|---|
| "无法验证开发者""cannot verify developer" | 系统设置 → 隐私与安全性 → "仍要打开"System Settings → Privacy & Security → "Open Anyway" |
| "已损坏,无法打开""damaged, can't be opened" | 终端执行:xattr -d com.apple.quarantine /Applications/CC\ Switch.appterminal: xattr -d com.apple.quarantine /Applications/CC\ Switch.app |
| Intel 和 Apple Silicon 搞混Intel vs Apple Silicon mismatch | 关于本机 → 查看芯片类型,下载对应版本About This Mac → check chip type, download the right build |
16.2.9.5 通用错误16.2.9.5 Common errors
| 错误代码Error code | 原因Cause | 解决方案Solution |
|---|---|---|
| 401 Unauthorized | API Key 无效invalid API Key | 检查 Key 格式(sk- + 64 位)check the Key format (sk- + 64 chars) |
| 402 quota_exceeded | 余额不足insufficient balance | 登录控制台充值log into the console to top up |
| 502 Bad Gateway | 上游厂商故障upstream vendor issue | 稍后重试或切换模型retry later or switch models |
| model not found | 模型不在分组中model not in the group | 登录控制台检查令牌分组log into the console to check the token group |
16.2.10 配置速查表16.2.10 Cheat sheet
16.2.10.1 关键参数(双系统通用)16.2.10.1 Key parameters (universal)
| 参数Parameter | 值Value | ⚠️ 说明⚠️ Notes |
|---|---|---|
| Base URL | https://api.wannapi.com/v1 | 必须带 /v1must include /v1 |
| Wire API | responses | Codex 专有协议Codex-only protocol |
| API Key 格式API Key format | sk- + 64 位 hex = 67 字符64 hex chars, 67 total | 无空格、无换行no spaces, no newlines |
| CC Switch | 必须保持运行must stay running | 可最小化到托盘 / 菜单栏minimize to tray / menu bar |
16.2.10.2 界面路径速查16.2.10.2 UI navigation
| 操作Action | 路径Path |
|---|---|
| 创建 API KeyCreate API Key | 万能API 控制台 → API Keys → + 新建Universal API console → API Keys → + New |
| 添加 ProviderAdd Provider | CC Switch → Codex → + Add Provider |
16.2.10.3 下载地址汇总16.2.10.3 Download links
| 软件Software | 系统OS | 下载地址Download |
|---|---|---|
| Codex | Windows | apps.microsoft.com |
| Codex | macOS | chatgpt.com/download |
| CC Switch | Windows | GitHub Releases(.exe) |
| CC Switch | macOS (Intel) | GitHub Releases(.dmg x64) |
| CC Switch | macOS (Apple Silicon) | GitHub Releases(.dmg aarch64) |
✅ 完成清单✅ Completion checklist
- Codex 桌面端已安装(Windows / macOS 对应版本)Codex Desktop installed (Windows / macOS build)
- 万能API Key 已创建并保存(
sk-+ 64 位 hex,共 67 字符)Universal API Key created and saved (sk-+ 64 hex, 67 chars total) - CC Switch 已安装并启动(下载对应系统版本)CC Switch installed and launched (downloaded the right build)
- CC Switch 中已添加 Codex 配置(Base URL、Wire API、Key、Model)Codex config added in CC Switch (Base URL, Wire API, Key, Model)
- 连通性测试通过connectivity test passed
- Codex 桌面端成功返回回复Codex Desktop returned a model reply
16.3 OpenCode 桌面端16.3 OpenCode Desktop开源 GUI
OpenCode 桌面端是 sst/opencode 项目的官方 GUI 形态(与 CLI 形态 5 章并存)。走 OpenAI Chat Completions 协议,配置最简单——只需 Base URL + API Key + 模型,无 wire_api 等额外字段。
OpenCode Desktop is the official GUI variant of sst/opencode (coexists with the CLI variant in section 5). It uses the OpenAI Chat Completions protocol, so the config is minimal—just Base URL + API Key + model, no wire_api or similar extras.
16.3.1 前置条件16.3.1 Prerequisites
- 已注册万能API 账号(注册入口)A registered Universal API account (sign up)
- 已安装 OpenCode Desktop(见 16.3.2)OpenCode Desktop installed (see 16.3.2)
- 当前网络可访问
https://api.wannapi.comNetwork reacheshttps://api.wannapi.com
16.3.2 安装 OpenCode Desktop16.3.2 Install OpenCode Desktop
- 打开 GitHub Releases,按系统选
.dmg(macOS)/.exe(Windows)/.AppImage(Linux)下载Open GitHub Releases; pick.dmg(macOS) /.exe(Windows) /.AppImage(Linux) - 按系统提示完成安装并启动Follow the system prompts to install and launch
- 首次启动看到模型选择界面是正常的——还没配 providerThe model picker on first launch is normal—provider is not yet configured
16.3.3 在万能API 控制台创建 OpenCode 专用令牌16.3.3 Create an OpenCode-dedicated token in the Universal API console
- 登录 wannapi.com → 控制台 → 令牌管理 → 添加令牌Log in to wannapi.com → Console → Token Management → Add Token
- 名称:建议
OpenCode 桌面Name:OpenCode Desktop(suggested) - 分组:选含
MiniMax-M3/claude-fable-5/deepseek-v4-pro的分组(详见 #models)Group: pick a group that containsMiniMax-M3/claude-fable-5/deepseek-v4-pro(see #models) - 提交 → 点击 复制密钥Submit → click Copy Key
16.3.4 在 OpenCode Desktop 配置 provider16.3.4 Configure the provider in OpenCode Desktop
- 打开 OpenCode Desktop → 右上角 设置 → 提供商 / ProvidersOpen OpenCode Desktop → top-right Settings → Providers
- 点击 添加自定义提供商 / Add Custom ProviderClick Add Custom Provider
- 按字段填:Fill the fields:
名称 / Name:Name / Provider:        wannapi
Base URL:           https://api.wannapi.com/v1
API Key:API Key: sk-粘贴上一步复制的密钥sk-paste the key you copied above- 点击 获取模型 / Fetch Models → 从列表选
MiniMax-M3/claude-fable-5/deepseek-v4-pro/gpt-5.5等(须确保在万能API 控制台分组中存在模型)(must exist in your Universal API token group)Click Fetch Models → pickMiniMax-M3/claude-fable-5/deepseek-v4-pro/gpt-5.5from the list (must exist in your Universal API token group) - 点击 保存Click Save
Base URL: 固定https://api.wannapi.com/v1fixed ashttps://api.wannapi.com/v1API Key: 万能API 令牌,sk-开头共 67 字符Universal API token, starts withsk-, 67 chars total- OpenCode 桌面端走 OpenAI Chat Completions 协议,无
wire_api字段(与 Codex 不同)OpenCode Desktop uses OpenAI Chat Completions; nowire_apifield (unlike Codex)
opencode-free,实际跑免费的 agnes-2.0-flash(512M 上下文、零费用),不消耗万能API 余额。需要更高质量时再切回 MiniMax-M3 / claude-fable-5 等付费模型。
Set opencode-free in the Model field — actually runs the free agnes-2.0-flash (512M context, zero cost) without touching your Universal API balance. Switch back to MiniMax-M3 / claude-fable-5 when you need higher quality.
16.3.5 启用并验证16.3.5 Enable and verify
- 设置中确认
wannapiprovider 已启用In Settings, confirm thewannapiprovider is enabled - 点击 测试连接 / Test Connection → 看到"成功"提示Click Test Connection → "Success" appears
- OpenCode Desktop → 新建对话 → 发送测试消息OpenCode Desktop → start a new chat → send a test message
- 收到模型回复即配置成功A model reply means configuration succeeded
16.3.6 常见问题16.3.6 FAQ
Q: 模型列表为空?Q: Model list is empty?
检查 Base URL 是否可访问;点击"刷新模型列表 / Refresh Models"重试;如仍为空,手动添加模型 ID(详见 #models)。Check Base URL is reachable; click "Refresh Models" to retry; if still empty, add model IDs manually (see #models).
Q: 测试连接失败?Q: Test connection fails?
检查 API Key 是否复制完整(67 字符,无空格);令牌分组是否含所选模型;网络可达 api.wannapi.com。Check API Key is copied in full (67 chars, no spaces); token group contains the selected model; network reaches api.wannapi.com.
Q: OpenCode Desktop 启动报错?Q: OpenCode Desktop errors on launch?
确认 OpenCode Desktop 是最新版本(v0.5+ 才支持自定义 provider);如旧版,请从 GitHub Releases 下载最新版。Confirm OpenCode Desktop is the latest version (v0.5+ supports custom providers); if older, download the latest from GitHub Releases.
18.1 CC Switch 安装18.1 CC Switch Installation多 Provider 切换
CC Switch(farion1231/cc-switch)是一款基于 Rust + Tauri 构建的轻量级(~6 MB)桌面工具,专门解决频繁手动修改 CLI 配置文件、切换不同 API Key 或代理地址的痛点。本节介绍 CC Switch 本身的安装流程;第 18.2 节介绍如何导入万能API Key,第 18.3 节介绍多 provider 切换。 CC Switch (farion1231/cc-switch) is a lightweight (~6 MB) desktop tool built with Rust + Tauri, solving the pain of repeatedly editing CLI config files to switch API keys or proxy URLs. This section covers CC Switch installation; 18.2 covers importing the Universal API key; 18.3 covers multi-provider switching.
18.1.1 支持范围18.1.1 Supported scope
- 支持的 AI CLI / 桌面端:Claude Code、Codex、Gemini CLI、OpenCode、OpenClaw、Claude Desktop、Codex Desktop、OpenCode Desktop 等Supported AI CLIs / desktops: Claude Code, Codex, Gemini CLI, OpenCode, OpenClaw, Claude Desktop, Codex Desktop, OpenCode Desktop, etc.
- 支持的操作系统:Windows 10+ / macOS 12+ / Linux(Ubuntu / Debian / Fedora)Supported OSes: Windows 10+ / macOS 12+ / Linux (Ubuntu / Debian / Fedora)
- 核心能力:一键切换 provider、系统托盘快速操作、云同步配置、MCP 协议支持Core features: one-click provider switching, system-tray quick access, cloud sync, MCP protocol support
18.1.2 下载安装18.1.2 Download & install
- 打开 GitHub Releases 页面:github.com/farion1231/cc-switch/releasesOpen the GitHub Releases page: github.com/farion1231/cc-switch/releases
- 按系统下载安装包:Download the installer for your OS:
Windows:  CC-Switch_x.x.x_x64-setup.exe     (.msi / .exe)
macOS:    CC-Switch_x.x.x_universal.dmg      (Intel + Apple Silicon)
Linux: CC-Switch_x.x.x_amd64.AppImage (或(or .deb / .rpm))- Windows:双击
.exe→ 按提示完成安装 → 启动Windows: double-click.exe→ follow prompts → launch - macOS:双击
.dmg→ 拖入 Applications → 在"系统设置 → 隐私与安全性"允许打开macOS: double-click.dmg→ drag to Applications → allow in "System Settings → Privacy & Security" - Linux:
chmod +x CC-Switch_*.AppImage && ./CC-Switch_*.AppImage,或sudo dpkg -i cc-switch_*.debLinux:chmod +x CC-Switch_*.AppImage && ./CC-Switch_*.AppImage, orsudo dpkg -i cc-switch_*.deb
18.1.3 启动与界面概览18.1.3 Launch and UI overview
启动 CC Switch 后,界面分三个区域:After launching, the UI has three zones:
- 左侧栏:列出所有支持的 AI 工具(Claude Code / Codex / OpenCode / Gemini CLI / Claude Desktop / ...),点击切换Left sidebar: lists all supported AI tools (Claude Code / Codex / OpenCode / Gemini CLI / Claude Desktop / ...); click to switch
- 中间主区:当前选中工具的 provider 列表,每个 provider 卡片显示名称、模型、状态(启用/未启用)Center pane: the selected tool's provider list; each card shows name, model, and status (enabled / disabled)
- 右上角操作:
+添加 provider / ⚙️ 设置 / ☁️ 云同步Top-right actions:+add provider / ⚙️ settings / ☁️ cloud sync
系统托盘图标(macOS 菜单栏 / Windows 系统托盘 / Linux 状态栏)会常驻 CC Switch,关闭主窗口不退出进程,可右键快速切换 provider。The system-tray icon (macOS menu bar / Windows system tray / Linux status bar) keeps CC Switch alive; closing the main window does not quit the process, so you can right-click to switch providers quickly.
18.1.4 常见问题18.1.4 FAQ
Q: macOS 提示"无法打开,因为无法验证开发者"?Q: macOS shows "cannot be opened because the developer cannot be verified"?
在"系统设置 → 隐私与安全性"底部点击"仍要打开";或先右键 → 打开 → 在弹窗中点"打开"。In "System Settings → Privacy & Security" click "Open Anyway" at the bottom; or right-click → Open → "Open" in the dialog.
Q: Linux AppImage 双击没反应?Q: Linux AppImage doesn't launch on double-click?
先在终端 chmod +x CC-Switch_*.AppImage 加执行权限,再 ./CC-Switch_*.AppImage 启动;如提示缺库,安装 libfuse2(Ubuntu 22.04+ 需要)。First chmod +x CC-Switch_*.AppImage to make it executable, then ./CC-Switch_*.AppImage; if a library is missing, install libfuse2 (required on Ubuntu 22.04+).
Q: 关掉主窗口后 provider 失效?Q: Provider stops working after I close the main window?
确认 CC Switch 在系统托盘常驻(关闭主窗口 ≠ 退出进程);若误点"退出",重启 CC Switch 并重新启用 provider。Make sure CC Switch stays in the system tray (closing the main window ≠ quitting); if you accidentally quit, relaunch CC Switch and re-enable the provider.
18.2 导入万能API Key18.2 Import the Universal API Key万能API 接入
CC Switch 安装后,下一步是把万能API Key 灌进 CC Switch,让所有支持的 AI CLI / 桌面端统一走万能API。本节以 Claude Code 为例演示完整流程;其他工具(Codex / OpenCode / Gemini CLI / Claude Desktop / Codex Desktop / OpenCode Desktop)的字段值差异在末尾"工具字段对照表"列出。 After installing CC Switch, the next step is to inject the Universal API key so all supported AI CLIs / desktops route through Universal API. This section uses Claude Code as the end-to-end example; field-value differences for other tools (Codex / OpenCode / Gemini CLI / Claude Desktop / Codex Desktop / OpenCode Desktop) are summarized in the "Tool field reference" table at the end.
18.2.1 前置条件18.2.1 Prerequisites
- 已注册万能API 账号(注册入口)A registered Universal API account (sign up)
- 已安装 CC Switch(见 18.1)CC Switch installed (see 18.1)
- 已安装目标 AI CLI / 桌面端(Claude Code / Codex / OpenCode / ...)The target AI CLI / desktop installed (Claude Code / Codex / OpenCode / ...)
- 当前网络可访问
https://api.wannapi.comNetwork reacheshttps://api.wannapi.com
18.2.2 在万能API 控制台创建令牌18.2.2 Create a token in the Universal API console
- 登录 wannapi.com → 控制台 → 令牌管理 → 添加令牌Log in to wannapi.com → Console → Token Management → Add Token
- 名称:建议
CC Switch 通用(一份 Key 喂所有工具)Name:CC Switch Universal(one key for all tools) - 分组:选含
claude-fable-5/MiniMax-M3/deepseek-v4-pro/gpt-5.5的全模型分组Group: pick an "all-models" group containingclaude-fable-5/MiniMax-M3/deepseek-v4-pro/gpt-5.5 - 额度:默认(不限制)Quota: default (unlimited)
- 提交 → 复制密钥(不是"复制连接信息")Submit → Copy Key (not "Copy Connection Info")
18.2.3 在 CC Switch 添加万能API provider18.2.3 Add the Universal API provider in CC Switch
- 打开 CC Switch → 左侧选目标工具(如 Claude Code)Open CC Switch → pick the target tool in the left sidebar (e.g. Claude Code)
- 右上角
+→ 选择 自定义 / Custom 模式(非 4sapi/官方 provider 模板)Click the+button (top-right) → pick Custom mode (NOT a 4sapi/official provider template) - 按字段填:Fill the fields:
供应商名称 / Name:Name / Provider:    Wannapi (Universal)
Base URL:             https://api.wannapi.com
API Key:API Key:              sk-粘贴上一步复制的密钥sk-paste the key you copied above
模型 / Model:Model: claude-fable-5(须确保在万能API 控制台分组中存在模型)(must exist in your Universal API token group)- 点击 保存 / SaveClick Save
- 回到供应商列表 → 找到
Wannapi (Universal)→ 点击 启用 / EnableBack in the provider list → findWannapi (Universal)→ click Enable - 点击 连通性测试 / Connectivity Test → 看到"连通正常"Click Connectivity Test → "Connected" appears
Base URL:https://api.wannapi.com(不带/v1,由 CC Switch 按工具自动拼/v1或/v1/messages)https://api.wannapi.com(no/v1; CC Switch appends/v1or/v1/messagesper tool)API Key: 万能API 令牌,sk-开头共 67 字符Universal API token, starts withsk-, 67 chars totalModel: 填一个默认模型即可;切模型在终端内用/model <name>(如/model claude-fable-5//model deepseek-v4-pro)A single default model is enough; switch at runtime via/model <name>(e.g./model claude-fable-5//model deepseek-v4-pro)
18.2.4 验证18.2.4 Verify
- 在终端启动对应工具:
claude/codex chat/opencode/geminiLaunch the tool in a terminal:claude/codex chat/opencode/gemini - 发送测试消息 → 收到模型回复即配置成功Send a test message → a model reply means configuration succeeded
- 在工具内用
/model切换模型验证多模型能力Use/modelinside the tool to switch models and verify multi-model support
18.2.5 工具字段对照表18.2.5 Tool field reference
不同 AI CLI / 桌面端在 CC Switch 里的字段值差异:Per-tool field-value differences inside CC Switch:
| 工具Tool | Base URLBase URL | 额外字段Extra fields | 参考Ref |
|---|---|---|---|
| Claude Code | https://api.wannapi.com | —— | #3 |
| Codex | https://api.wannapi.com/v1 | wire_api = responses 必填required | #4 |
| OpenCode | https://api.wannapi.com/v1 | —— | #5 |
| Gemini CLI | https://api.wannapi.com | —— | #6 |
| Claude Desktop | https://api.wannapi.com | —— | #16.1 |
| Codex Desktop | https://api.wannapi.com/v1 | Wire API: responses 必填required | #16.2 |
| OpenCode Desktop | https://api.wannapi.com/v1 | —— | #16.3 |
18.2.6 常见问题18.2.6 FAQ
Q: 复制密钥后保存报错?Q: Save fails after copying the key?
确认复制的是 复制密钥,不是 复制连接信息;万能API 令牌共 67 字符(sk- + 64 hex),无空格无换行。Make sure you clicked Copy Key, not Copy Connection Info; the Universal API token is 67 chars (sk- + 64 hex), no spaces or newlines.
Q: 连通性测试失败?Q: Connectivity test fails?
按顺序检查:① 令牌已启用;② 令牌分组含所选模型;③ Base URL 与工具对应(Claude / Gemini 不带 /v1,Codex / OpenCode 带 /v1);④ 网络可达 api.wannapi.com。Check in order: ① token enabled; ② token group contains the selected model; ③ Base URL matches the tool (Claude / Gemini: no /v1; Codex / OpenCode: with /v1); ④ network reaches api.wannapi.com.
Q: 模型切换不生效?Q: Model switch not taking effect?
在工具内用 /model <name> 切;CC Switch 用户改完模型后必须重启 CC Switch 和工具,让新模型 ID 写入配置文件。Switch via /model <name> inside the tool; CC Switch users must restart both CC Switch and the tool after changing the model, so the new ID is written to the config file.
18.3 多 provider 配置18.3 Multi-Provider Configuration高级用法
CC Switch 的杀手锏是多 provider 切换:一份配置里同时挂 DeepSeek、Claude、GLM 等多个 provider,需要时一键切换。本节以 Claude Code 为例演示"DeepSeek + Claude 双 provider"配置;其他工具同理。 CC Switch's killer feature is multi-provider switching: keep DeepSeek, Claude, GLM, etc. as separate providers in one config and switch with one click. This section uses Claude Code as the end-to-end example ("DeepSeek + Claude dual-provider"); the same pattern applies to other tools.
18.3.1 适用场景18.3.1 When to use
- 成本敏感:日常 coding 用
deepseek-v4-pro(便宜),关键决策用claude-fable-5(强)Cost-sensitive: daily coding ondeepseek-v4-pro(cheap); critical decisions onclaude-fable-5(strong) - 中文/英文切换:中文注释用
deepseek-v4-pro,英文文档用claude-fable-5CN/EN switching: Chinese comments ondeepseek-v4-pro; English docs onclaude-fable-5 - A/B 对比:同一段 prompt 发两个模型对比效果A/B comparison: send the same prompt to two models and compare
18.3.2 添加多 provider18.3.2 Add multiple providers
在万能API 控制台创建两份令牌(或一份令牌两个分组),分别对应不同模型的额度/优先级:Create two tokens in the Universal API console (or one token in two groups), one per model usage / priority:
- 控制台 → 令牌管理 → 添加令牌 → 名称
Wannapi-Claude→ 分组选 Claude 系列Console → Token Management → Add Token → nameWannapi-Claude→ group: Claude family - 再添加一个 → 名称
Wannapi-DeepSeek→ 分组选 DeepSeek /deepseek-v4-proAdd another → nameWannapi-DeepSeek→ group: DeepSeek /deepseek-v4-pro - 在 CC Switch 左侧选 Claude Code → 右上角
+→ 自定义 → 填第一份(Claude)配置并保存In CC Switch, left sidebar → Claude Code → top-right+→ Custom → fill the first (Claude) config and save - 再次点
+→ 填第二份(DeepSeek)配置:Click+again → fill the second (DeepSeek) config:
Provider A:Provider A: 名称=Name=Wannapi-Claude
  Base URL:  Base URL:     https://api.wannapi.com
  API Key:  API Key:      sk-... (Wannapi-Claude 令牌Wannapi-Claude token)
  模型:  Model:         claude-fable-5

Provider B:Provider B: 名称=Name=Wannapi-DeepSeek
  Base URL:  Base URL:     https://api.wannapi.com
  API Key:  API Key:      sk-... (Wannapi-DeepSeek 令牌Wannapi-DeepSeek token)
  模型:  Model:         deepseek-v4-pro
18.3.3 一键切换18.3.3 Switch with one click
- CC Switch 供应商列表会显示
Wannapi-Claude和Wannapi-DeepSeek两张卡CC Switch's provider list shows two cards:Wannapi-ClaudeandWannapi-DeepSeek - 点
Wannapi-DeepSeek卡的 启用 → 该卡绿色高亮,其他卡自动禁用Click Enable on theWannapi-DeepSeekcard → that card highlights in green, others auto-disable - 重启 Claude Code(
claude)→ 当前对话走 DeepSeekRestart Claude Code (claude) → the current session routes through DeepSeek - 需要切回 Claude → CC Switch 点
Wannapi-Claude启用 → 重启 Claude CodeTo switch back to Claude → click Enable onWannapi-Claudein CC Switch → restart Claude Code
- CC Switch 系统托盘右键 → "快速切换"菜单可直接选 provider,无需打开主窗口Right-click the CC Switch tray icon → "Quick Switch" menu lets you pick a provider without opening the main window
- 启用云同步(设置 → 云同步)后,多台电脑可共享同一份 provider 配置Enable cloud sync (Settings → Cloud Sync) to share the same provider config across multiple machines
- 如想"不重启工具"切模型,仍可在工具内用
/model <name>切当前 provider 已配的多个模型If you want to switch without restarting, use/model <name>inside the tool to swap between models that the current provider already has
18.3.4 常见问题18.3.4 FAQ
Q: 多 provider 切换后工具还是用旧模型?Q: The tool still uses the old model after switching providers?
必须重启工具(Claude Code / Codex / ...)让新 provider 写回配置;CC Switch 改完状态后退出工具再启动。You must restart the tool (Claude Code / Codex / ...) so the new provider is written back; after CC Switch updates, quit and relaunch the tool.
Q: 两份令牌可以合并成一份吗?Q: Can I merge the two tokens into one?
可以。在万能API 控制台添加令牌时,分组选"全模型"分组(含 Claude + DeepSeek + GPT + GLM),即可一份 Key 喂所有 provider 卡片。Yes. When adding a token in the Universal API console, pick an "all-models" group (containing Claude + DeepSeek + GPT + GLM); one key then powers all provider cards.
Q: 云同步会泄露 API Key 吗?Q: Does cloud sync leak API keys?
CC Switch 的云同步走端到端加密(参考官方 README),Key 在传输和存储时均加密。但若极度敏感,可关闭云同步、本地多设备之间用导出/导入 .json 备份配置。CC Switch's cloud sync is end-to-end encrypted (see the official README); keys are encrypted in transit and at rest. For maximum sensitivity, disable cloud sync and use export/import .json to back up configs across machines.
17.1 Chatbox17.1 Chatbox通用 OpenAI 兼容
Chatbox 是一款开源、跨平台的桌面 AI 客户端(Windows / macOS / Linux),支持 OpenAI / Claude API 兼容模式。本节介绍如何用 Chatbox 接入万能API。 Chatbox is an open-source, cross-platform desktop AI client (Windows / macOS / Linux) that supports both OpenAI- and Claude-API-compatible modes. This section shows how to plug Universal API into Chatbox.
17.1.1 前置条件17.1.1 Prerequisites
- 已注册万能API 账号(注册入口)A registered Universal API account (sign up)
- 当前网络可访问
https://api.wannapi.comNetwork reacheshttps://api.wannapi.com
17.1.2 安装17.1.2 Install
- 打开 chatboxai.app,按系统下载安装包Open chatboxai.app and download the installer for your OS
- 按系统提示完成安装并启动Follow the system prompts to install and launch
17.1.3 配置17.1.3 Configure
- 启动 Chatbox → 左下角 设置 / SettingsLaunch Chatbox → Settings in the bottom-left
- 点击 添加 / Add → 名称填
Wannapi→ API 模式选 Claude API 兼容(自动用 Anthropic 协议走万能API)Click Add → nameWannapi→ API mode: Claude API compatible (routes through Universal API via the Anthropic protocol) - 按字段填:Fill the fields:
名称 / Name:Name / Provider:    Wannapi
API 模式 / Mode:API Mode:          Claude API 兼容compatible
API Key:API Key:               sk-粘贴你的万能API 令牌sk-paste your Universal API token
API Host:              https://api.wannapi.com
默认模型 / Model:Default Model: claude-fable-5(须确保在万能API 控制台分组中存在模型)(must exist in your Universal API token group)- 保存Save
API Host: 固定https://api.wannapi.com(不带/v1,由 Chatbox 自动拼)fixed ashttps://api.wannapi.com(no/v1; Chatbox appends the path automatically)API Key: 万能API 令牌,sk-开头共 67 字符Universal API token, starts withsk-, 67 chars totalModel: 详见 #models;常用claude-fable-5/MiniMax-M3/deepseek-v4-pro/gpt-5.5see #models; common picks:claude-fable-5/MiniMax-M3/deepseek-v4-pro/gpt-5.5
17.1.4 验证与常见问题17.1.4 Verify & FAQ
- 返回对话界面 → 新建对话 → 发送测试消息Return to chat → start a new conversation → send a test message
- 收到模型回复即配置成功A model reply means configuration succeeded
Q: API 模式选 OpenAI 兼容还是 Claude API 兼容?Q: Should I pick OpenAI-compatible or Claude-API-compatible mode?
推荐 Claude API 兼容,自动走 Anthropic 协议,与万能API 的 Claude 模型族兼容性最好。如要使用 GPT / DeepSeek 等 OpenAI 系模型,切换到 OpenAI API 兼容,API Host 改为 https://api.wannapi.com/v1。Pick Claude API compatible for best compatibility with the Claude model family on Universal API. For GPT / DeepSeek / other OpenAI-family models, switch to OpenAI API compatible and set API Host to https://api.wannapi.com/v1.
Q: 模型列表为空?Q: Model list is empty?
检查 API Host 是否可访问;在"默认模型"手动填一个 ID(如 claude-fable-5)保存后即可使用,模型列表会自动拉取。Check API Host is reachable; type a model ID manually (e.g. claude-fable-5) in "Default Model" and save—the list will fetch on next load.
17.2 Cherry Studio17.2 Cherry Studio多模型聚合
Cherry Studio 是一款开源的多模型桌面客户端(Windows / macOS / Linux),支持同时配置多个 LLM provider(OpenAI / Claude / Gemini / ...),并提供知识库、画布等增强能力。本节介绍如何用 Cherry Studio 接入万能API。 Cherry Studio is an open-source multi-model desktop client (Windows / macOS / Linux) that supports concurrent configuration of multiple LLM providers (OpenAI / Claude / Gemini / ...) and adds knowledge bases, canvas, etc. This section shows how to plug Universal API into Cherry Studio.
17.2.1 前置条件17.2.1 Prerequisites
- 已注册万能API 账号(注册入口)A registered Universal API account (sign up)
- 当前网络可访问
https://api.wannapi.comNetwork reacheshttps://api.wannapi.com
17.2.2 安装17.2.2 Install
- 打开 cherry-ai.com → 下载三平台安装包Open cherry-ai.com → download the installer for your OS
- 按系统提示完成安装并启动Follow the system prompts to install and launch
17.2.3 配置万能API provider17.2.3 Configure the Universal API provider
Cherry Studio 支持按模型族分别添加 provider,同一份万能API Key 可喂所有 provider:Cherry Studio lets you add providers per model family; the same Universal API key can power all of them:
- 左下角 设置 / Settings → 模型服务 / Model ServicesBottom-left Settings → Model Services
- 添加 Claude 类型 provider:Add a Claude-type provider:
名称 / Name:Name / Provider:        Wannapi Claude
API Key:API Key:            sk-粘贴你的万能API 令牌sk-paste your Universal API token
API 地址 / Host:API Host:           https://api.wannapi.com
模型 / Models:Models: claude-fable-5, claude-opus-4-8, ...(须确保在万能API 控制台分组中存在模型)(must exist in your Universal API token group)- 添加 OpenAI 类型 provider(喂 GPT / DeepSeek / MiniMax-M3 等):Add an OpenAI-type provider (for GPT / DeepSeek / MiniMax-M3):
名称 / Name:Name / Provider:        Wannapi OpenAI
API Key:API Key:            sk-粘贴你的万能API 令牌sk-paste your Universal API token
API 地址 / Host:API Host:           https://api.wannapi.com/v1
模型 / Models:Models: gpt-5.5, MiniMax-M3, deepseek-v4-pro, agnes-2.0-flash, ...- 添加 Gemini 类型 provider(如需):Add a Gemini-type provider (if needed):
名称 / Name:Name / Provider:        Wannapi Gemini
API Key:API Key:            sk-粘贴你的万能API 令牌sk-paste your Universal API token
API 地址 / Host:API Host:           https://api.wannapi.com
模型 / Models:Models: gemini-2.5-pro, ...- 所有 provider 填完保存Save all providers
- Claude provider 的 API 地址不带
/v1;OpenAI provider 的 API 地址带/v1;Gemini 视版本而定Claude provider API address no/v1; OpenAI provider API address with/v1; Gemini depends on the version API Key: 同一份万能API 令牌可在所有 provider 复用,共 67 字符the same Universal API token can be reused across providers, 67 chars total- 模型列表详见 #modelsfull model list at #models
17.2.4 验证与常见问题17.2.4 Verify & FAQ
- 新建对话 → 顶部选模型(
claude-fable-5/MiniMax-M3/ ...)Start a new chat → pick a model at the top (claude-fable-5/MiniMax-M3/ ...) - 发送测试消息 → 收到回复即配置成功Send a test message → a reply means configuration succeeded
Q: 添加 provider 时报"无效的 API 地址"?Q: "Invalid API address" when adding a provider?
检查类型选对:Claude 走 Anthropic 协议(不带 /v1),OpenAI 走 Chat Completions 协议(带 /v1),混用会校验失败。Check the type matches the protocol: Claude uses Anthropic (no /v1), OpenAI uses Chat Completions (with /v1); mixing them fails validation.
Q: 模型列表只显示部分模型?Q: Model list only shows a subset?
Cherry Studio 按 provider 类型过滤模型;如要使用 MiniMax-M3,需在 OpenAI provider 列表里加(不是 Claude 列表)。Cherry Studio filters models by provider type; to use MiniMax-M3, add it under the OpenAI provider, not the Claude one.
17.3 WorkBuddy17.3 WorkBuddy自定义模型
WorkBuddy 是一款 Windows 优先的桌面 AI 客户端(macOS 有限支持),主打自定义模型 + 工作场景(写作、绘图、PPT 等)。本节介绍如何用 WorkBuddy 接入万能API。 WorkBuddy is a Windows-first desktop AI client (limited macOS support) focused on custom models + work scenarios (writing, image gen, slides, etc.). This section shows how to plug Universal API into WorkBuddy.
17.3.1 前置条件17.3.1 Prerequisites
- 已注册万能API 账号(注册入口)A registered Universal API account (sign up)
- Windows 10+(macOS 仅部分功能)Windows 10+ (macOS has limited functionality)
- 当前网络可访问
https://api.wannapi.comNetwork reacheshttps://api.wannapi.com
17.3.2 安装17.3.2 Install
- 前往 WorkBuddy 官网下载 Windows 安装包(macOS 用户请参考 17.1 Chatbox 或 17.2 Cherry Studio)Download the Windows installer from the WorkBuddy website (macOS users see 17.1 Chatbox or 17.2 Cherry Studio)
- 按系统提示完成安装、登录、进入主界面Follow the system prompts to install, log in, and reach the main UI
17.3.3 配置万能API 自定义模型17.3.3 Configure a Universal API custom model
- 主界面点击 模型 / Models → 自定义模型 / Custom ModelIn the main UI click Models → Custom Model
- 按字段填(以
claude-fable-5为例,可按需替换为其他模型):Fill the fields (usingclaude-fable-5as an example; swap for other models as needed):
模型名称 / Name:Model name:        Wannapi Claude
Base URL:               https://api.wannapi.com
API Key:API Key:                sk-粘贴你的万能API 令牌sk-paste your Universal API token
模型 ID / Model ID:Model ID: claude-fable-5(须确保在万能API 控制台分组中存在模型)(must exist in your Universal API token group)- 点击 保存 / SaveClick Save
- 如模型列表里看不到刚加的项,退出软件重新进 即可(WorkBuddy 当前版本有缓存)If the new model doesn't appear in the list, quit and relaunch the app (WorkBuddy currently caches the list)
Base URL:https://api.wannapi.com(不带/v1,由 WorkBuddy 自动拼/v1/chat/completions)https://api.wannapi.com(no/v1; WorkBuddy appends/v1/chat/completions)API Key: 万能API 令牌,sk-开头共 67 字符Universal API token, starts withsk-, 67 chars totalModel ID: 与 #models 一致;常用claude-fable-5/MiniMax-M3/deepseek-v4-pro/gpt-5.5must match #models; common picks:claude-fable-5/MiniMax-M3/deepseek-v4-pro/gpt-5.5
17.3.4 验证与常见问题17.3.4 Verify & FAQ
- 主界面选择刚配的模型 → 输入提示词 → 发送Pick the just-configured model in the main UI → enter a prompt → send
- 收到模型回复即配置成功A model reply means configuration succeeded
Q: 保存后模型列表找不到?Q: Saved but the model doesn't show in the list?
退出 WorkBuddy 重新进即可(已知缓存行为);如仍不显示,检查 Base URL 是否可访问、API Key 是否 67 字符。Quit and relaunch WorkBuddy (known caching behavior); if still missing, check Base URL is reachable and API Key is 67 chars.
Q: macOS 能用吗?Q: Does it work on macOS?
macOS 官方支持有限,建议用 17.1 Chatbox 或 17.2 Cherry Studio 替代。macOS support is limited; use 17.1 Chatbox or 17.2 Cherry Studio instead.
19.1 Cursor19.1 CursorAI 优先 IDE
Cursor 是基于 VS Code 的 AI 优先 IDE(Claude Code 兼容内核)。本节介绍如何让 Cursor 走万能API(OpenAI 兼容 + Anthropic 兼容双协议)。 Cursor is an AI-first IDE built on VS Code (Claude Code-compatible core). This section shows how to make Cursor route through Universal API (both OpenAI- and Anthropic-compatible protocols work).
19.1.1 前置条件19.1.1 Prerequisites
- 已注册万能API 账号(注册入口)A registered Universal API account (sign up)
- 已安装 Cursor(cursor.com)Cursor installed (cursor.com)
- 当前网络可访问
https://api.wannapi.comNetwork reacheshttps://api.wannapi.com
19.1.2 配置 OpenAI 兼容 provider(推荐)19.1.2 Configure the OpenAI-compatible provider (recommended)
- Cursor → Settings(
Ctrl+,/Cmd+,)→ ModelsCursor → Settings (Ctrl+,/Cmd+,) → Models - 找到 OpenAI API Key 区域 → 勾选 Override OpenAI Base URLFind the OpenAI API Key section → check Override OpenAI Base URL
- 按字段填:Fill the fields:
OpenAI API Key:       sk-粘贴你的万能API 令牌sk-paste your Universal API token
OpenAI Base URL:      https://api.wannapi.com/v1
模型 / Models:Models: gpt-5.5, MiniMax-M3, deepseek-v4-pro, agnes-2.0-flash, ...(须确保在万能API 控制台分组中存在模型)(must exist in your Universal API token group)- 保存 → 重启 CursorSave → restart Cursor
19.1.3 配置 Anthropic 兼容 provider(可选)19.1.3 Configure the Anthropic-compatible provider (optional)
如需使用 Claude 系列模型(claude-fable-5 / claude-opus-4-8):To use the Claude family (claude-fable-5 / claude-opus-4-8):
- Settings → Models → Add Custom ModelSettings → Models → Add Custom Model
- 模型名填
wannapi/claude-fable-5(或wannapi/claude-opus-4-8)Model name:wannapi/claude-fable-5(orwannapi/claude-opus-4-8) - API Key 填万能API 令牌,Base URL 填
https://api.wannapi.comAPI Key: Universal API token; Base URL:https://api.wannapi.com
OpenAI Base URL: 固定https://api.wannapi.com/v1fixed ashttps://api.wannapi.com/v1API Key: 万能API 令牌,sk-开头共 67 字符Universal API token, starts withsk-, 67 chars total- Cursor 用
provider/model-id复合 ID;模型 ID 须在 #models 支持列表里Cursor usesprovider/model-idcomposite IDs; model IDs must be in the #models list
19.1.4 验证与常见问题19.1.4 Verify & FAQ
- Cursor 主界面 →
Ctrl+K唤起 AI → 选wannapi/claude-fable-5→ 输入 prompt → 收到回复即成功Cursor main UI →Ctrl+Kto invoke AI → pickwannapi/claude-fable-5→ enter a prompt → a reply means success
Q: 模型列表为空?Q: Model list is empty?
Base URL 必须以 /v1 结尾(https://api.wannapi.com/v1),漏写会导致 Cursor 拉不到模型列表;手动在"Add Custom Model"里填 ID 也可。Base URL must end with /v1 (https://api.wannapi.com/v1); a missing /v1 leaves the list empty. You can also type a model ID manually in "Add Custom Model".
Q: Claude 模型报"未授权"?Q: Claude models return "unauthorized"?
确认令牌分组含 Claude 模型;自定义模型用 wannapi/claude-fable-5 完整 ID(不是裸的 claude-fable-5)。Confirm the token group includes Claude models; use the full wannapi/claude-fable-5 ID for the custom model (not bare claude-fable-5).
19.2 VS Code19.2 VS CodeClaude Code for VS Code
VS Code 通过官方 Claude Code for VS Code 扩展接入万能API(内核与 CLI 形态的 Claude Code 一致,详见 #3 Claude Code)。本节介绍插件安装与配置。 VS Code talks to Universal API through the official Claude Code for VS Code extension (same core as the CLI variant, see #3 Claude Code). This section covers extension install and configuration.
19.2.1 前置条件19.2.1 Prerequisites
- 已注册万能API 账号(注册入口)A registered Universal API account (sign up)
- 已安装 VS Code(code.visualstudio.com)VS Code installed (code.visualstudio.com)
- 当前网络可访问
https://api.wannapi.comNetwork reacheshttps://api.wannapi.com
19.2.2 安装 Claude Code for VS Code 扩展19.2.2 Install the Claude Code for VS Code extension
- VS Code 左侧活动栏 → 扩展 / Extensions(
Ctrl+Shift+X/Cmd+Shift+X)VS Code left activity bar → Extensions (Ctrl+Shift+X/Cmd+Shift+X) - 搜索框输入
Claude Code→ 找到 Anthropic 官方的 Claude Code for VS Code 扩展SearchClaude Code→ pick Anthropic's official Claude Code for VS Code extension - 点击 安装 / InstallClick Install
- 安装完成后左侧活动栏出现 Claude 图标A Claude icon appears in the left activity bar after install
19.2.3 配置万能API19.2.3 Configure Universal API
插件的 settings 路径:~/Library/Application Support/Code/User/settings.json(macOS)/ %APPDATA%\Code\User\settings.json(Windows)。Plugin settings path: ~/Library/Application Support/Code/User/settings.json (macOS) / %APPDATA%\Code\User\settings.json (Windows).
{
  "claudeCode.apiKey": "sk-粘贴你的万能API 令牌sk-paste your Universal API token",
  "claudeCode.baseUrl": "https://api.wannapi.com",
  "claudeCode.model": "claude-fable-5(须确保在万能API 控制台分组中存在模型)(must exist in your Universal API token group)"
}- 按上述 JSON 填入(密钥替换为你的万能API 令牌)Fill the JSON above (replace the key with your Universal API token)
- 保存 → 重启 VS CodeSave → restart VS Code
claudeCode.baseUrl: 固定https://api.wannapi.com(不带/v1,与 CLI 形态一致)fixed ashttps://api.wannapi.com(no/v1, same as the CLI variant)claudeCode.apiKey: 万能API 令牌,sk-开头共 67 字符Universal API token, starts withsk-, 67 chars totalclaudeCode.model: 默认模型,详见 #models;常用claude-fable-5/claude-opus-4-8default model, see #models; common picks:claude-fable-5/claude-opus-4-8
19.2.4 验证与常见问题19.2.4 Verify & FAQ
- VS Code 左侧 Claude 图标 → 点击 → 在对话框输入测试消息VS Code left activity bar → click the Claude icon → enter a test message in the dialog
- 收到模型回复即配置成功A model reply means configuration succeeded
Q: 插件报"无法连接 API"?Q: Extension shows "cannot connect to API"?
检查 claudeCode.baseUrl 是否为 https://api.wannapi.com(不带 /v1);网络可达该地址;令牌分组含所选模型。Check claudeCode.baseUrl is https://api.wannapi.com (no /v1); network is reachable; token group contains the selected model.
Q: 想用 GPT / DeepSeek 等 OpenAI 系模型?Q: Want to use GPT / DeepSeek / other OpenAI-family models?
装 Cline 扩展(搜索 Cline)→ OpenAI 兼容 provider → Base URL https://api.wannapi.com/v1 + 万能API 令牌,详见 19.3 Trae(Trae 的 Cline 配置与 VS Code 一致)。Install the Cline extension (search Cline) → OpenAI-compatible provider → Base URL https://api.wannapi.com/v1 + Universal API token; see 19.3 Trae (Trae's Cline config is identical to VS Code's).
19.3 Trae19.3 TraeAI 原生 IDE
Trae 是一款 AI 原生 IDE,基于 VS Code 构建,因此 VS Code 的插件市场在 Trae 里完全兼容。本节介绍如何用 Cline 插件在 Trae 中接入万能API。 Trae is an AI-native IDE built on VS Code, so the VS Code extension marketplace is fully compatible. This section shows how to use the Cline extension inside Trae to talk to Universal API.
19.3.1 前置条件19.3.1 Prerequisites
- 已注册万能API 账号(注册入口)A registered Universal API account (sign up)
- 已安装 Trae(trae.cn)Trae installed (trae.cn)
- 当前网络可访问
https://api.wannapi.comNetwork reacheshttps://api.wannapi.com
19.3.2 安装 Cline 插件19.3.2 Install the Cline extension
- Trae 左侧活动栏 → 扩展 / Extensions(图标方块状)Trae left activity bar → Extensions (the blocks icon)
- 搜索框输入
Cline→ 点击 安装 / InstallSearchCline→ click Install - 安装完成后左侧活动栏出现 Cline 图标A Cline icon appears in the left activity bar after install
19.3.3 配置万能API19.3.3 Configure Universal API
- 点击 Cline 图标 → 设置界面 → 选 OpenAI Compatible 作为 API ProviderClick the Cline icon → Settings → pick OpenAI Compatible as the API Provider
- 按字段填:Fill the fields:
Base URL:        https://api.wannapi.com/v1
API Key:API Key:         sk-粘贴你的万能API 令牌sk-paste your Universal API token
Model ID: gpt-5.5 (或(or MiniMax-M3 / deepseek-v4-pro / claude-fable-5))(须确保在万能API 控制台分组中存在模型)(must exist in your Universal API token group)- 保存Save
Base URL: 固定https://api.wannapi.com/v1(带/v1,OpenAI 兼容协议)fixed ashttps://api.wannapi.com/v1(with/v1, OpenAI-compatible protocol)API Key: 万能API 令牌,sk-开头共 67 字符Universal API token, starts withsk-, 67 chars totalModel ID: 必须与 #models 一致,直接复制粘贴过来(区分大小写)must match #models; copy/paste directly (case-sensitive)
19.3.4 验证与常见问题19.3.4 Verify & FAQ
- Cline 图标 → 输入 prompt → 收到模型回复即成功Cline icon → enter a prompt → a model reply means success
Q: 模型列表找不到?Q: Model not in the list?
Model ID 手动输入即可;必须与 #models 完全一致(区分大小写),不能随意改写。Type the model ID manually; it must match #models exactly (case-sensitive)—don't paraphrase.
Q: 想用 Claude 模型?Q: Want to use Claude models?
Cline 走 OpenAI 协议,Claude 模型在万能API 也兼容 OpenAI Chat Completions,Model ID 直接填 claude-fable-5(不带 wannapi/ 前缀),Base URL 用 https://api.wannapi.com/v1 即可。Cline uses the OpenAI protocol; Universal API's Claude models are OpenAI Chat-Completions compatible, so set Model ID to claude-fable-5 directly (no wannapi/ prefix) and Base URL to https://api.wannapi.com/v1.
15. 联系支持15. Contact Support
- 邮箱Email: luodashao_vip@126.com
- 官网Website: https://wannapi.com